
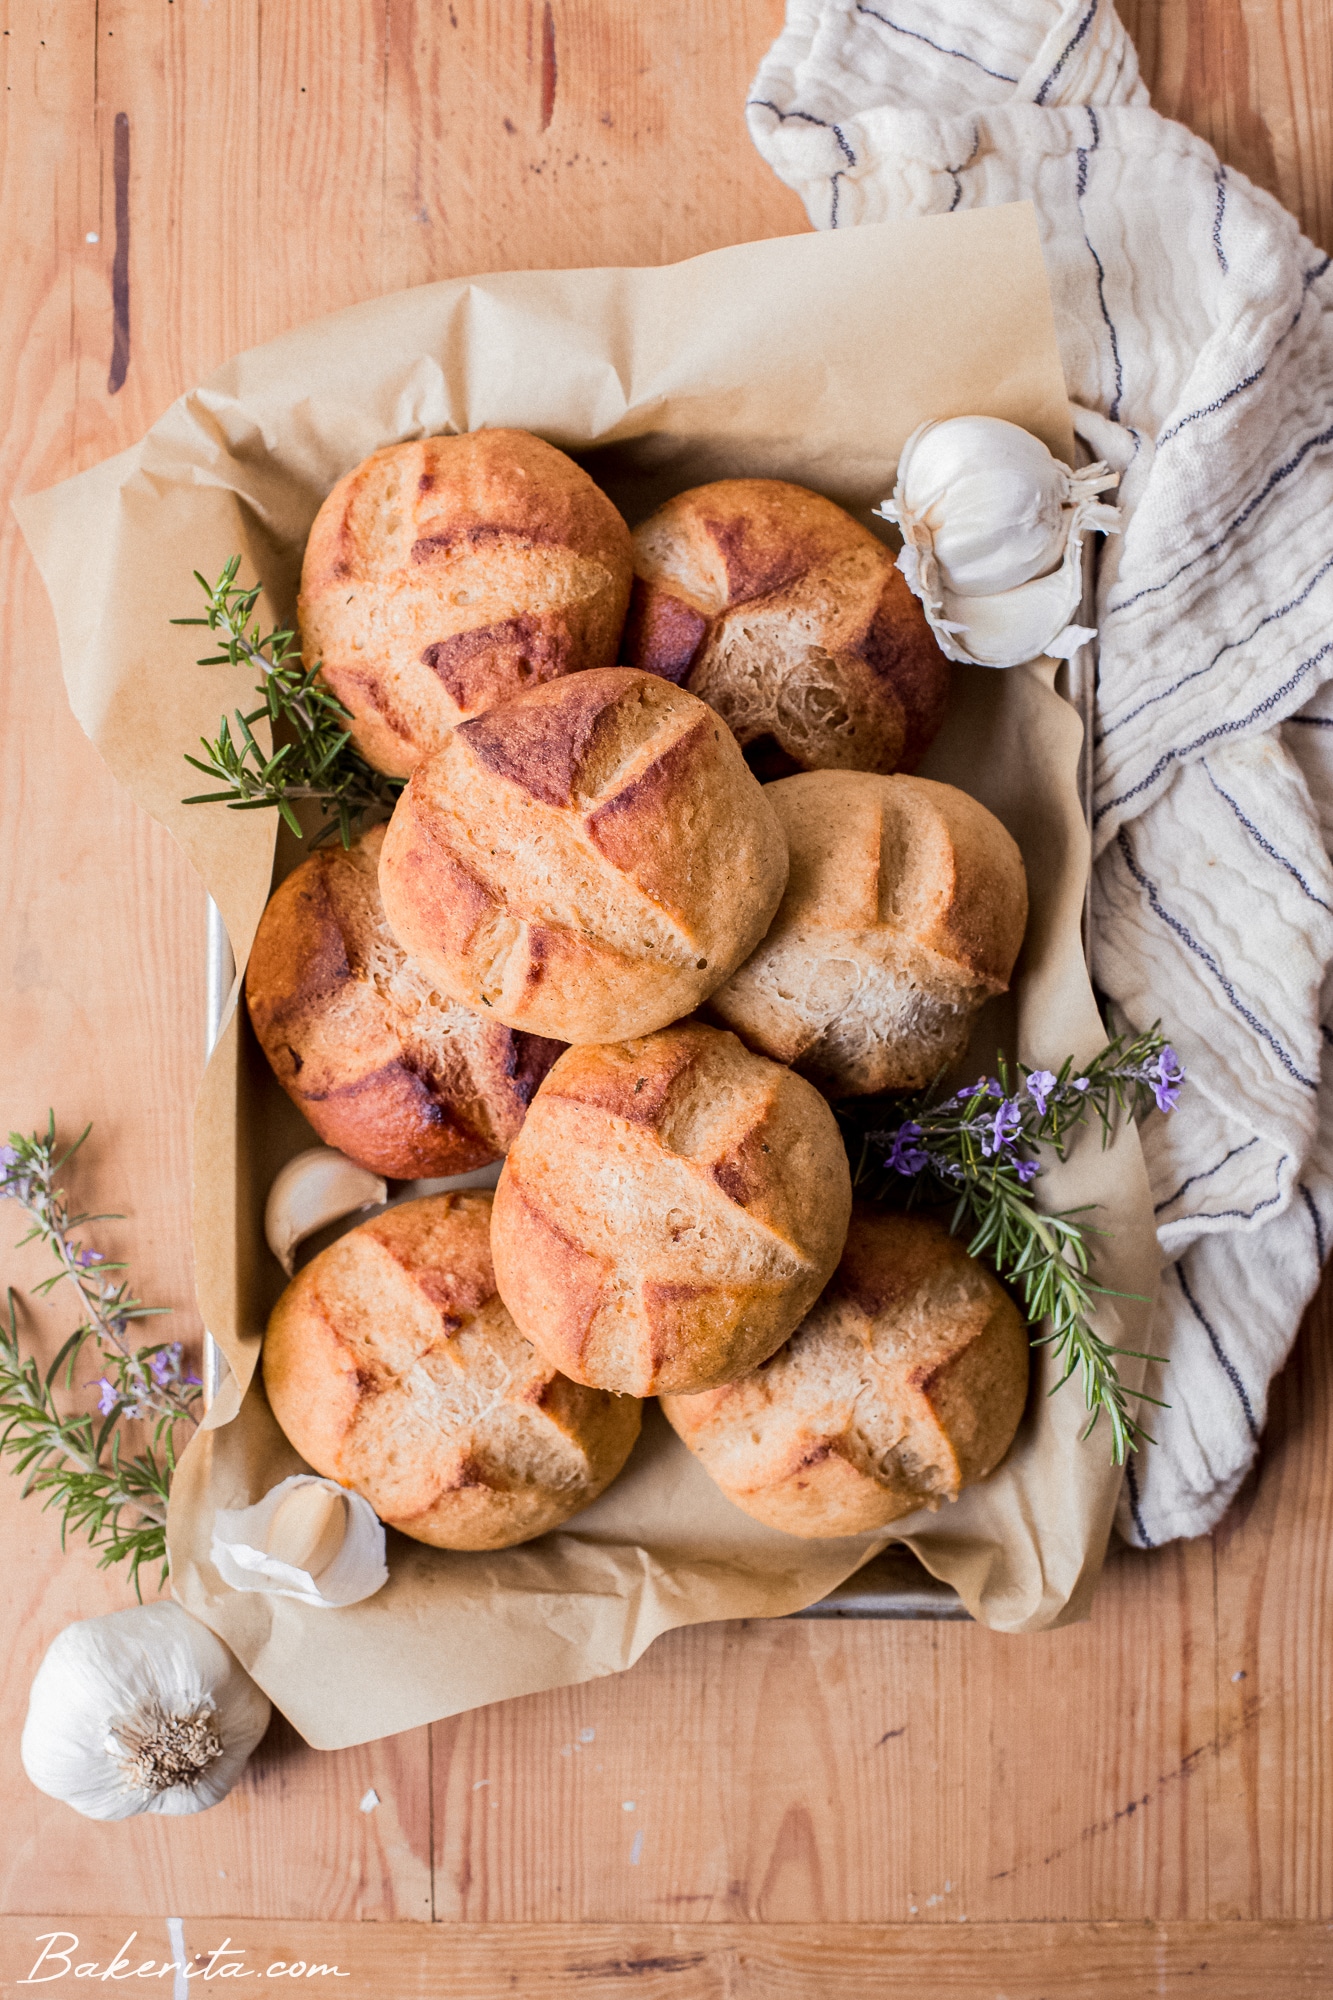
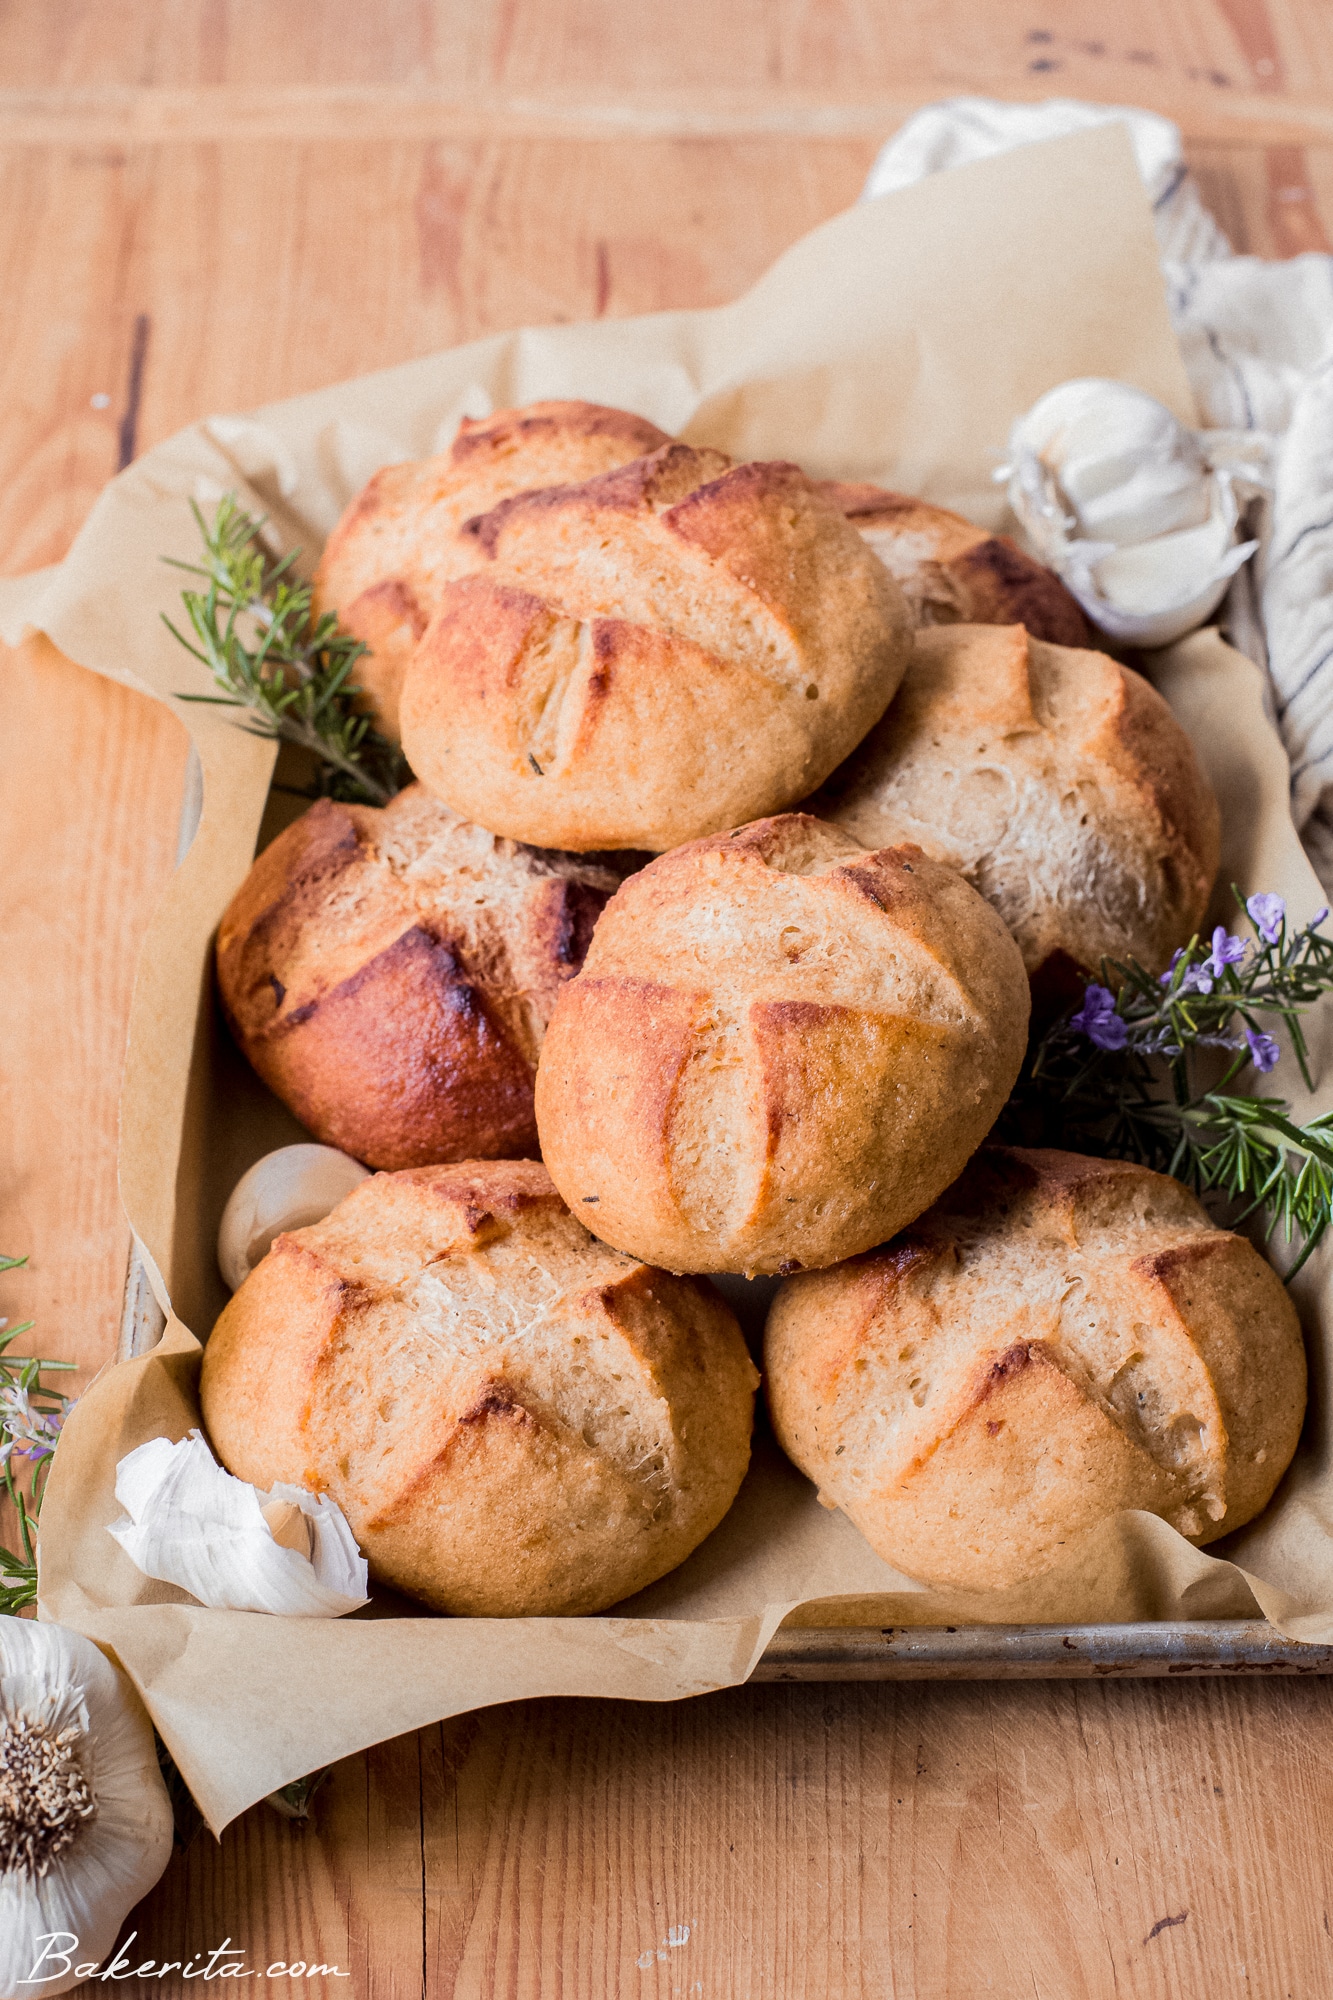
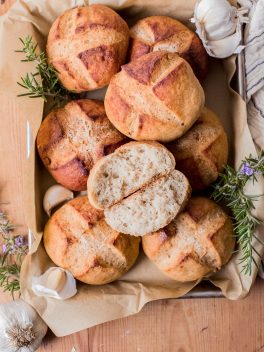
These fluffy and delicious Gluten-Free Sourdough Rolls are made with roasted garlic and rosemary! They’re so flavorful and perfect for serving alongside your favorite soup, used as the bread for a sandwich or burger, or just eaten slathered with butter.
I’ve been deep in gluten-free sourdough land for over a year now, and we’re officially addicted to all things gluten-free sourdough in this house. If you don’t have a gluten-free sourdough starter yet…what are you waiting for?! It’s not too hard to make and the bounties that will come from it are infinite.
It’s so easy to get obsessed with baking gluten-free sourdough bread loaves once you get started, tinkering with time and temperature to get your perfect fluffy, sour loaf. And then you’ve got your discard…ready to be turned into sourdough focaccia, the BEST gluten-free sourdough pizza crust, sourdough chocolate chip cookies, sourdough crackers, and so many other goodies.
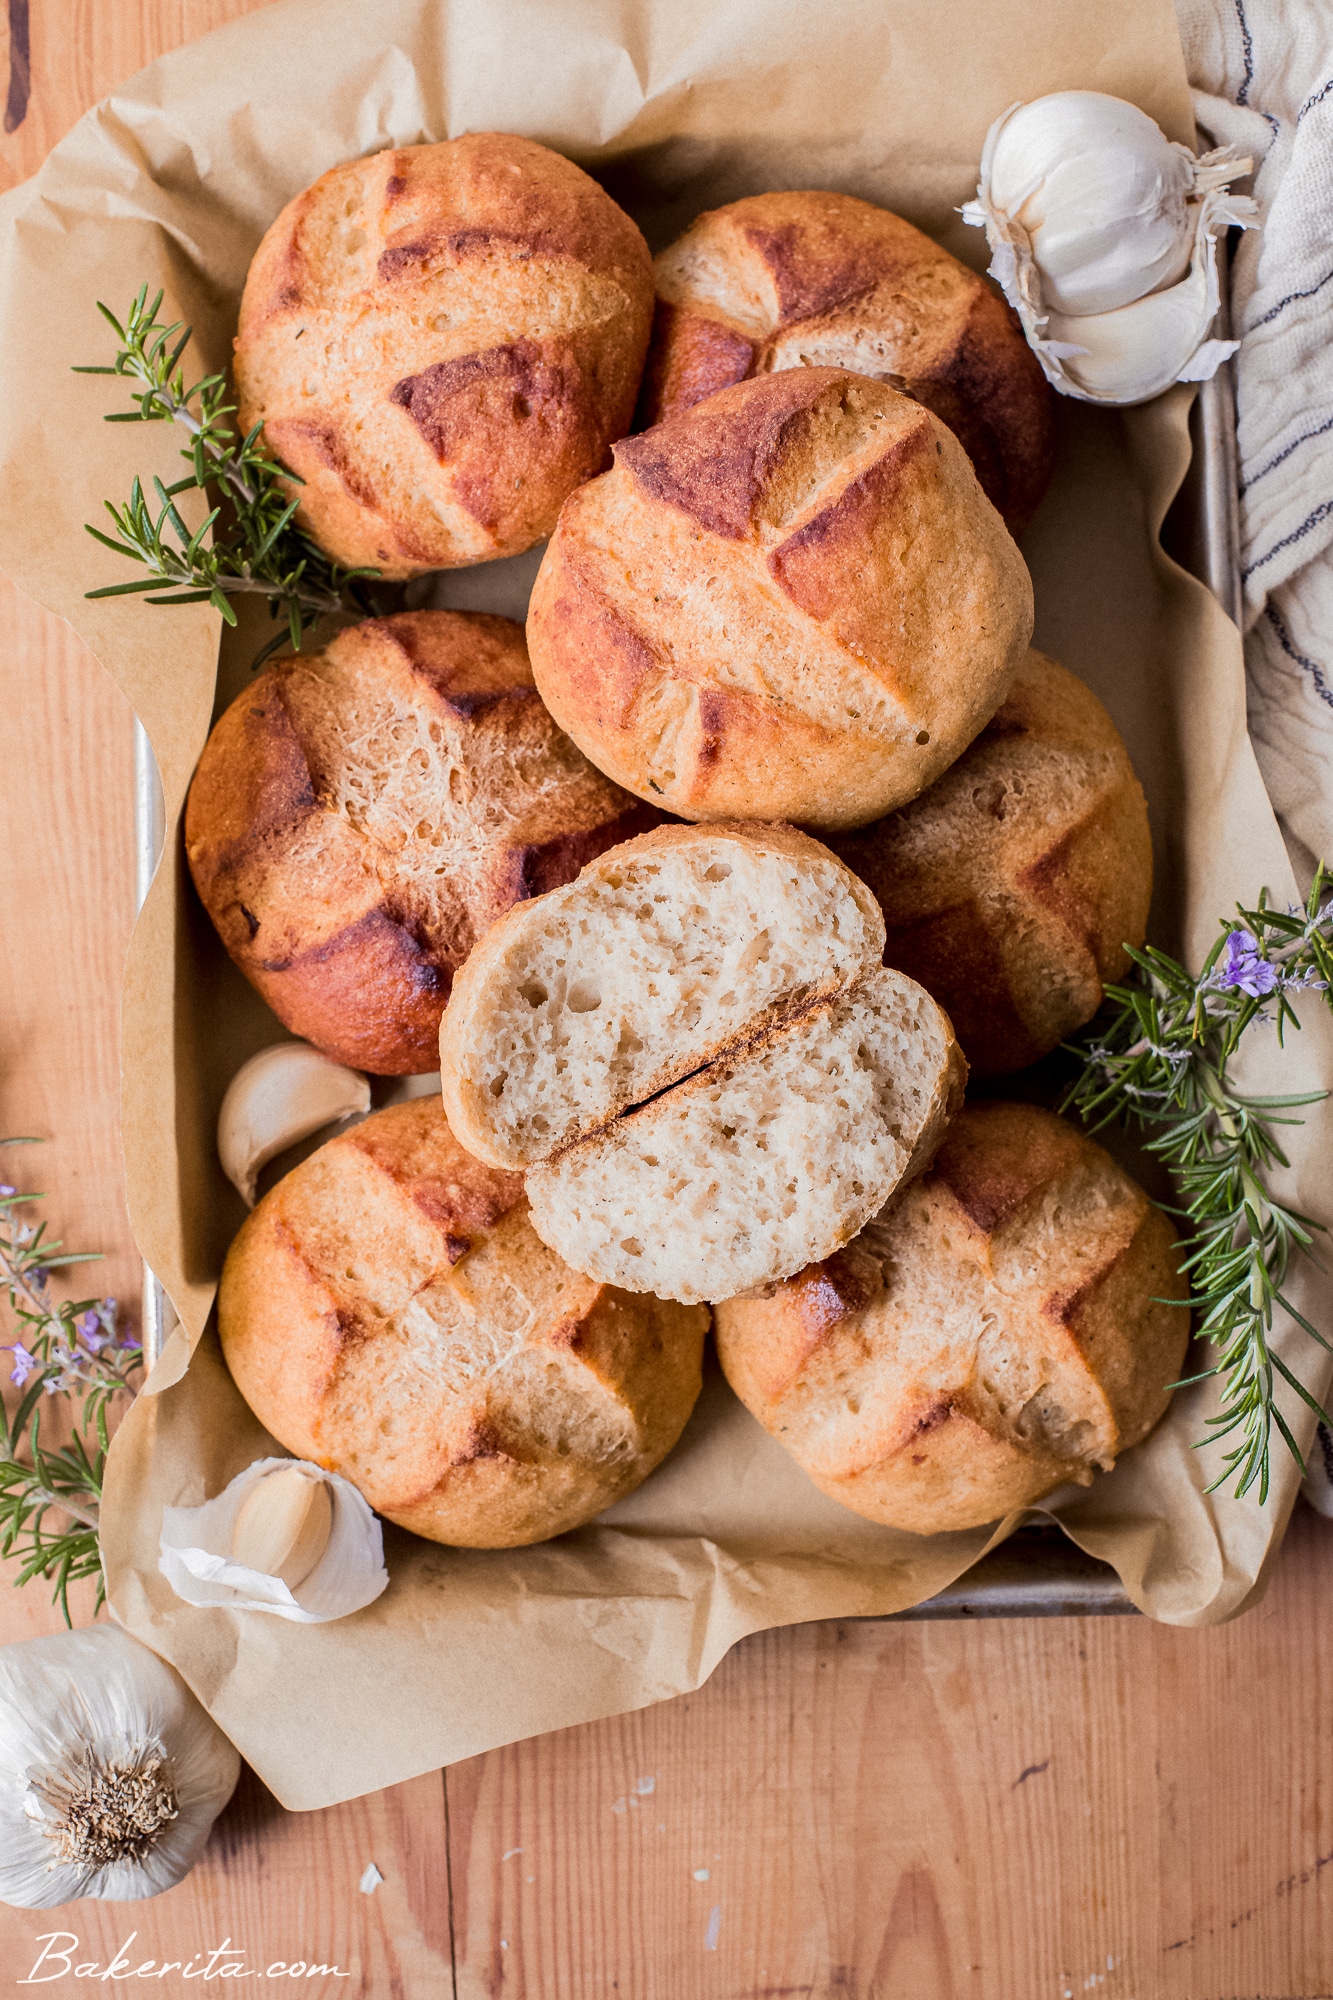
These Gluten-Free Sourdough Rolls are the newest sourdough obsession that I know you’ll adore as much as all of the others. They’re soft, fluffy, super flavorful, and so delicious.
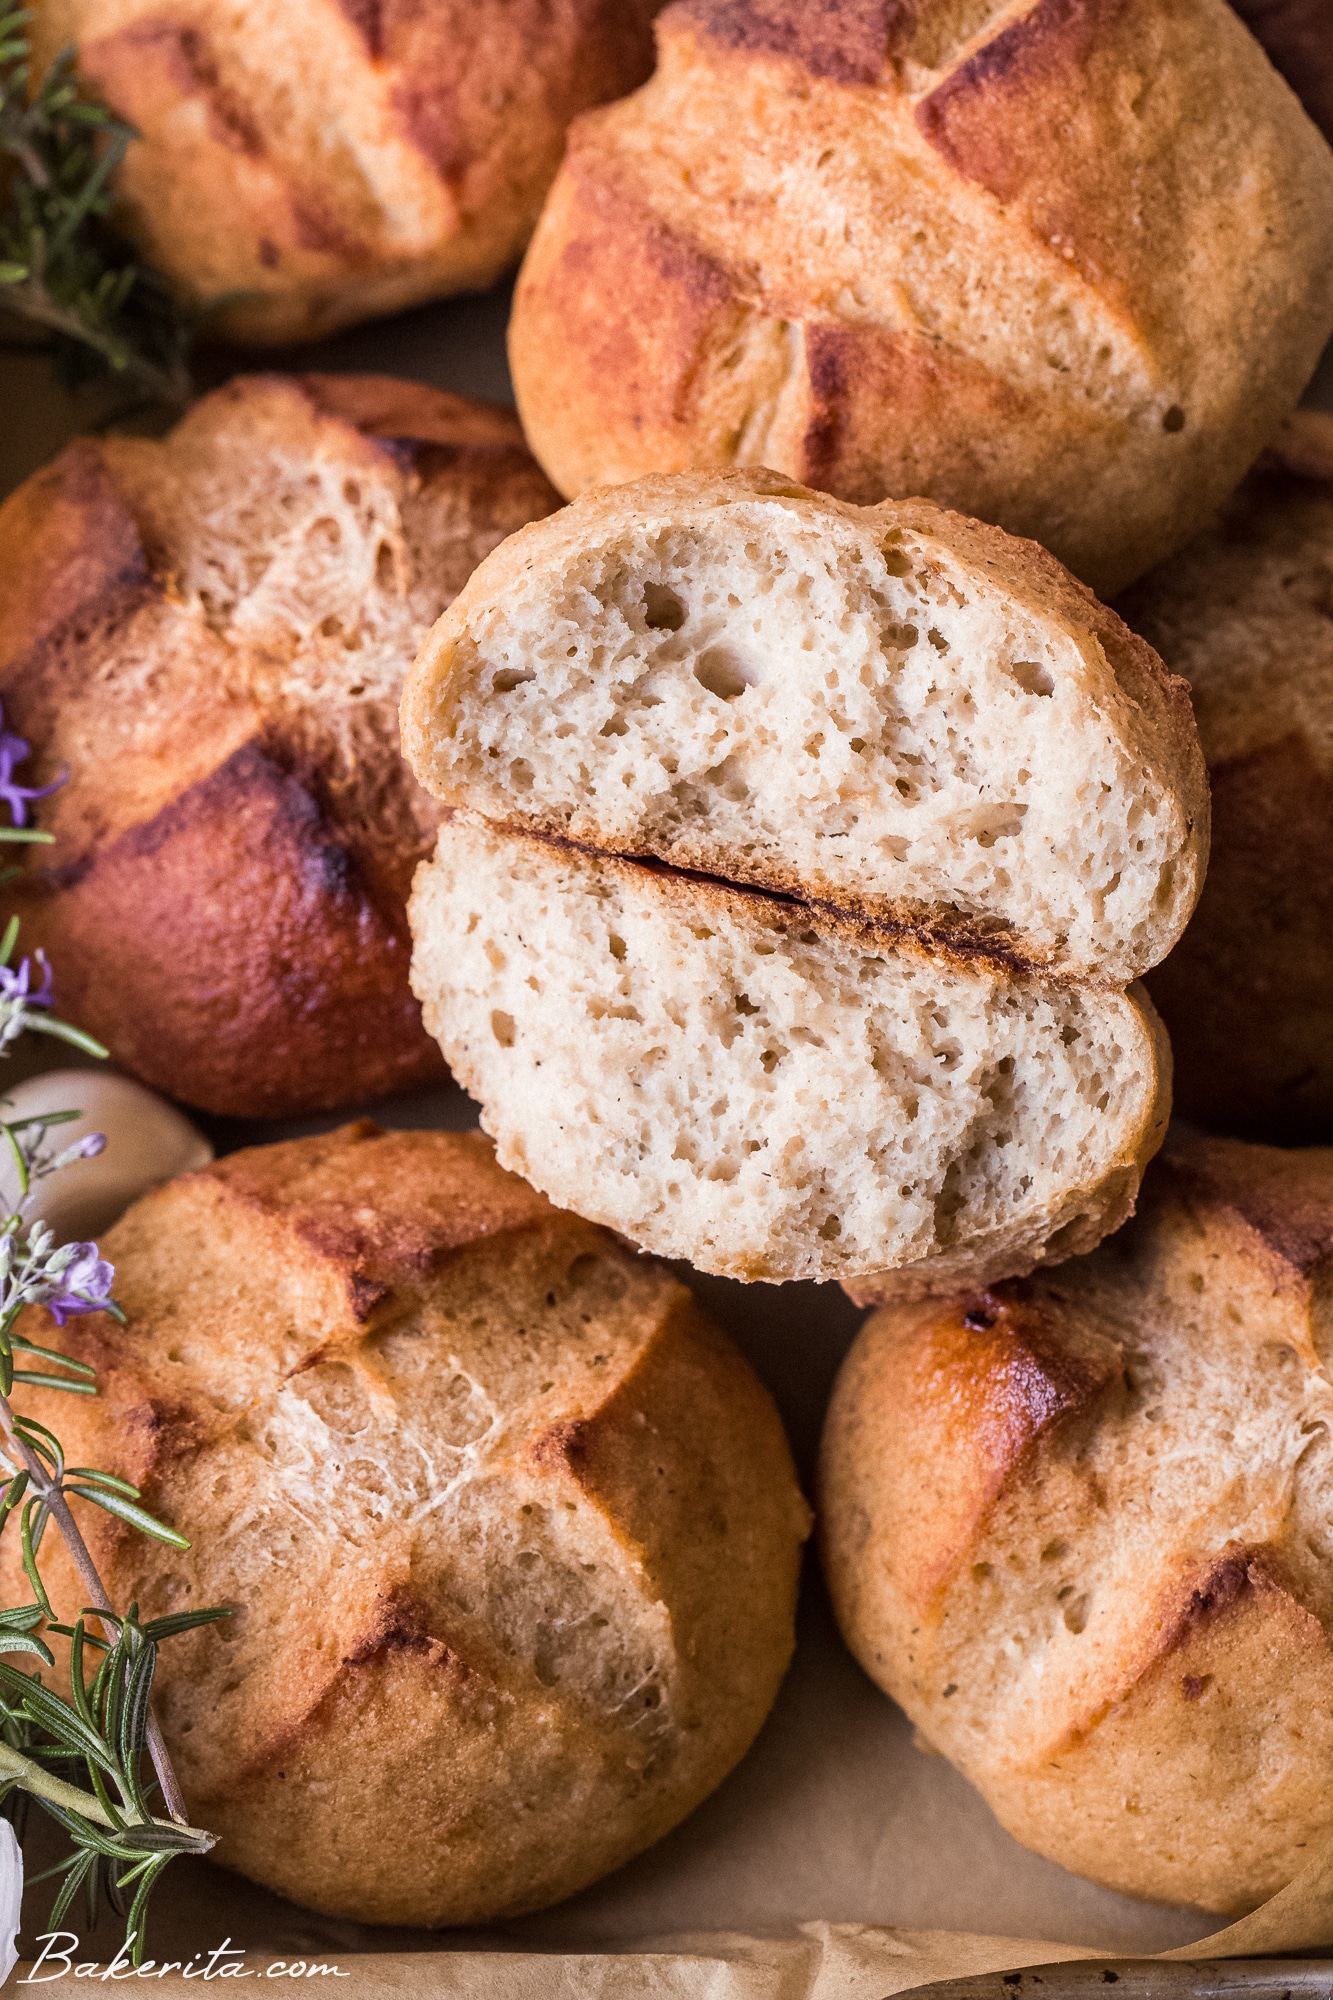
I flavored mine with roasted garlic and rosemary. I’ve included the measurements to make that variation in the recipe below, or you can just leave those out and have classic dinner rolls. These sourdough rolls aren’t quite as soft as a regular dinner roll, as they have a chewier, crispier crust, but I certainly don’t think that’s a bad thing. One day, I’ll create a recipe with a super soft crust, but these aren’t quite that. Doesn’t make them less delicious though :D
Here’s what you need for gluten-free sourdough rolls:
- Gluten-Free Sourdough Starter: make sure it’s nice and active for the fluffiest rolls!
- Psyllium Husk: this acts as our gluten and is a great binder, it makes the dough easy to work with and provides chewiness.
- Maple Syrup: this helps feed the yeast in our starter, it doesn’t add sweetness.
- Water: for the dough’s hydration :)
- Starches: you can use tapioca starch, arrowroot starch, and/or potato starch. I typically use a combination of potato and tapioca.
- Whole Grain Flours: I use some combination of quinoa flour, brown & white rice flours, and sorghum flour for this recipe. You can choose your favorite combination!
- Salt: for flavor, of course.
- Flavorings: I use roasted garlic and rosemary for this batch, but you can be creative here, or leave them plain.
How to make the rolls:
The dough for these rolls is made very similarly to my gluten-free sourdough bread, but once you get to shaping the dough, things veer off a little bit! Let’s get into it.
- Make your preferment by combining the sourdough starter with some water and flour. Let it rest and rise for at least four hours, or up to 10.
- Mix up your dough, adding in your desired flavors to the dough.
- Divide into rolls, I like to do 6 rolls, which results in a good size roll that isn’t too large or too small, however you can make them bigger or smaller.
- Let rise until fluffy. This will depend on the ambient temperature, but they should have a nice spring and puffiness when you press lightly with a fingertip.
- Bake until golden brown! Then enjoy, these are SO good warm!
Other flavor ideas…
If you’re not into roasted garlic and rosemary, here are some other add-in ideas:
- Sun-dried tomatoes
- Shredded cheese, vegan if needed
- Herbs of your choice
I hope you love these gluten-free sourdough rolls, and that they make a star appearance on your dinner table soon! Enjoy :D and let me know what you think in the comments below!
Want more gluten-free sourdough?
- Gluten-Free Sourdough Focaccia
- Gluten-Free Sourdough Discard Crackers
- Easy Gluten-Free Sourdough Pizza
- Vegan Gluten-Free Sourdough Chocolate Chip Cookies
Gluten-Free Sourdough Rolls
Ingredients
Preferment
- 150 g active gluten-free sourdough starter, it should be at peak rise and super bubbly
- 100 g filtered water
- 80 g superfine brown rice flour
Liquids
- 22 g psyllium husk, the whole husks, not psyllium husk powder
- 20 g maple syrup or honey
- 300 g filtered water
- 8 to 15 g olive oil, optional, helps soften the crust slightly, skip if your roasted garlic is packed in oil
Flour Mix (see Notes for options)
- 80 g potato starch, not potato flour!
- 60 g tapioca flour, or arrowroot flour
- 80 g quinoa flour
- 80 g superfine brown rice flour, or sorghum flour
- 12 g sea salt
Mix-ins
- 4 g (1 tablespoon) dried rosemary, crushed between your palms
- 35 g roasted garlic, if packed in oil, drain off as much oil as you can before adding
Instructions
To make the preferment
- In a bowl, mix together 150g active starter, water, and brown rice flour. Mix until smooth, and then cover and let rest for anywhere between 4 and 8 hours.150 g active gluten-free sourdough starter, 100 g filtered water, 80 g superfine brown rice flour
To make the dough
- Whisk together the psyllium husk, sweetener, and water. Whisk until combined and let gel while preparing the flour mixture.22 g psyllium husk, 20 g maple syrup or honey, 300 g filtered water
- In a large bowl or stand mixer, combine all of the flours + starches, plus salt and rosemary.80 g potato starch, 60 g tapioca flour, 80 g quinoa flour, 80 g superfine brown rice flour, 12 g sea salt, 4 g (1 tablespoon) dried rosemary
- Whisk the psyllium gel mixture into the preferment, along with the olive oil if using.8 to 15 g olive oil
- Add the wet ingredients to the flour mixture. Use a spoon and then your hands to bring the dough together, or use your dough hook to mix all of the ingredients until a smooth dough forms. It will take a few minutes in a stand mixer. If you’re using your hands, you will likely want to knead the dough together for a few minutes to make sure all the flour is hydrated and the dough is smooth. When the dough is almost together, add in the roasted garlic and mix until it’s incorporated but not completely crushed into the dough.35 g roasted garlic
- Once your dough is soft and smooth, turn it out onto a clean, smooth work surface. Divide the dough in 6 equally sized pieces – I usually use my scale to ensure consistency. Lightly flour it if your dough seems sticky – mine usually doesn’t need any flour. Knead each piece into a smooth ball, and use your hands to shape the dough into a round.
- Place each shaped roll seam-side down onto a lined baking sheet. Cover, and let the dough proof for about three to five hours (it can be closer to five if it’s cold, sometimes even longer, or quicker if it’s warm) at room temperature.
When you’re ready to bake
- An hour before your dough is fully proofed, turn on the oven to 425°F.
- When your oven is preheated and your dough is well-proofed, brush each roll with olive oil or an egg wash, which will encourage browning. Then, score each roll as desired. I usually just do a simple X score for rolls.
- Place into the oven, and bake for 30 to 40 minutes, depending on how brown you’d like your rolls.
- Once the rolls are golden brown to your liking, remove them from the oven. Once they’re cool enough to handle, remove the rolls from the sheet pan and let cool on a wire rack so the bottoms don’t get soggy.
To store your sourdough rolls
- It will keep well at room temperature for a day or two. They’ll get stale quicker than a regular loaf since they’re smaller. You can store them in a linen bread bag to extend their life. If your rolls get a bit stale, put it in a 300°F for 10 minutes to refresh the crust. You can also freeze them.


Would these proof overnight in the fridge or would I ruin them if I tried that long of a proof? Iv heard these are the best GF rolls! Can’t wait to try them.
Hi Mikelle, an overnight proof should work well for these! Enjoy :)
These are THE BEST gluten free rolls! The outside it slightly crunchy, the inside nice and bubbly and chewy. I did make them with the psyllium husk powder because that was all I could find. Per the recommendation of another comment on here, just add a little extra water. I also made it with King Arthur 1:1 flour and just kept the total flour grams the same. They turned out wonderful! Even my non-GF fiancé is stealing them!
So glad you love them, Catherine! Grateful for the feedback :)
Hi—-Can you used your bread flour mix for this? If so, do I just add together the amount of all the grams of the flours? You mention “see notes for options” but I don’t see a notes section. I plan on substituting millet flour for brown rice, that’s how my bread flour mix is made. Thanks!
Hi Emily, you certainly can! Just add up all the starches and flours and replace with that amount of bread mix. Millet instead of brown rice will be just fine. Enjoy!
I’ve made this twice, and it’s easy and awesome.
Both times I made it without add-ins, the 1st time with buckwheat flour instead of quinoa, and the 2nd time with the recipe as written.
We preferred the buckwheat version, but if you are doing the add-ins, that probably hides the quinoa flavor.
I had no idea before seeing this website’s gluten free starter recipe that you could even have gluten free sourdough, but it’s so impressive and easy! It smells like sourdough! It looks like sourdough bread! It TASTES like sourdough! Absolutely life changing, and I can’t wait to make more gluten free sourdough recipes. I’m dehydrating some of the sourdough starter just in case, cause seriously, it’s life changing and I never want to be without it!!
Love this comment and review, Tawn! Thank you so much for your thoughtfulness, happy I could bring gluten-free sourdough into your life :)
Can these be stored in the freezer? If so, for how long and how would you reheat them? Thanks so much!!! :)
Yes! As long as they’re well wrapped, they should last at least a few months. Double layer protection (such as wrapping indiviually in foil/plastic wrap and then also sealing in a freezer bag or container) will help prevent freezer burn. I would let them defrost in the fridge overnight and then heat in the oven at low heat (250-300F) until warmed through :) enjoy!
If rising on the counter do you cover with plastic wrap or a damp towel? And if overnight proofing what do you cover them with in the refrigerator? Thank you!
Hi Martha, I usually use plastic wrap but a towel will work as well. If rising in the refrigerator, I recommend plastic so they don’t dry out.
These are fantastic! Between this recipe and your gf sourdough pizza crust you’ve got me finally believing I can have good gf bread after 10+ years of eating gf. Thank you! Any chance you know of a good gf sourdough naan recipe?
This makes me so happy to hear, Aubry! The closest to naan I’ve made is my gluten-free flatbreads, but it uses yeast, not sourdough.
Yes you can use that starter for this recipe!
Would I still use the King 1 to 1 as my flour, along with the tapioca ?
Hi Tara, I personally don’t use 1:1 flours in my recipes so you can try but I can’t guarantee the results since I haven’t done it myself.
We’re so excited to make your recipes! It’s Wednesday night now – so earlier today on day 4.5? of the starter it doubled in size already. (I started Sat night -not morning- with initial rice flour and water). Have been following your directions discarding to use only 100-120 gm then feeding 50 gm flour + water. Nice bubbles, good texture like your video. It doesn’t have a strong sourdough bread smell to me yet and I’m sure it is not bad. Do I still have to throw away discard until day 7 before baking bread with it? Is the rise or smell more important? Is this the time to switch to 100% hydration feedings? Thank you!
Hi Melissa, I would recommend waiting until day 7 to make sure there is no bad bacteria and waiting for it to get a little more strength, but you can try baking a little earlier if you prefer. If the smell is pleasantly yeasty, you can use the discard. The smell is the most important thing to indicate any bad bacteria – you want to avoid baking with anything that smells bad, like acetone or alcohol. And yes you’ll want to switch to 100% feedings!
Thank you for the helpful reply. It’s hot here we keep house at 74 night -77-78 day (Texas) so that’s probably helping along with having a towel underneath so the cold granite counter doesn’t cool it. I can’t smell much of anything since it’s pollen season here lol. We’ll bake this weekend!
Do you happen to have nutrition information on these?
Just added approximate nutritional info – it can be found at the bottom of the recipe card!