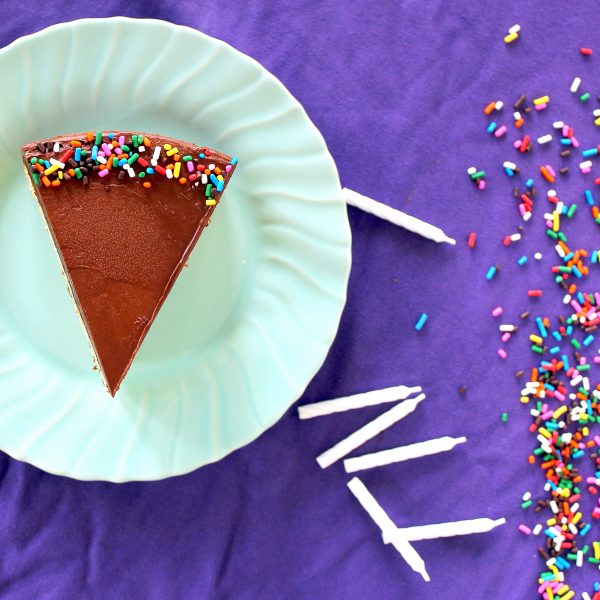
This Yellow Birthday Cake with Fluffy Chocolate Ganache Frosting is my mom’s all time favorite birthday cake! This easy recipe makes a delicious classic.

For as long as I can remember, my mom’s favorite cake to make for any occasion that called for a “fancy” dessert was this yellow cake with chocolate frosting from the cookbook The Cake Doctor. It used a cake mix, but followed some different instructions, such as butter in place of oil, and other little tweaks to make the recipe taste better and more homemade.
My mom has made this cake countless times, for all of the family members birthdays, turned into cupcakes to bring to class parties, and for when we wanted dessert and she felt like baking. I’ve made it numerous times as well, and it’s a good cake. It’s perfect when we need a quick, easy, and relatively impressive dessert. Because let’s be honest: aren’t layer cakes always impressive? I know I’m always impressed by them.
However, while the Cake Doctor does make a mean cake, something about the boxed cake mix freaks me out. Now now, I still use it from time to time when I’m in a rush, and I definitely used boxes at school where baking was tough and I needed shortcuts.

Yet, I’m always a fan of homemade vs. the boxed stuff, because you don’t exactly know what is in there. I prefer to use the ingredients I use everyday and trust where they come from rather than the preservative-laden boxes. Since I’ve now taken over as the token baker in the family and I’m constantly trying out new recipes, the old-standby has fallen by the wayside.

The Cake Doctor recipe has remained a favorite of my momma’s though, because she’s addicted to that classic combo of a moist yellow cake, enrobed in a rich chocolate frosting (who isn’t?!). So when her birthday rolled around last week and she requested that delightful combo, I decided to make her favorite cake, but make a homemade version that I knew she would love.
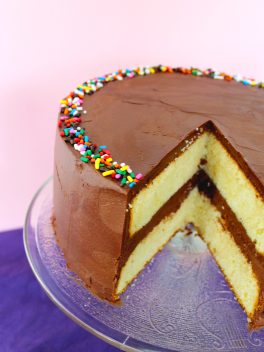
I pulled out a few cookbooks to see if they had any similar recipes, and alas! Flour by Joanne Chang had the perfect recipe: Yellow Birthday Cake with Fluffy Chocolate Ganache Frosting. It looked amazing, sounded perfect for what I needed, and didn’t look too hard, as far as layer cakes go. So, I made it. And boy, we were all impressed! My mom and her colleagues all enjoyed it, despite the frosting being a bit messed up from a fall in the car on the drive to the office (oops!).

It has a wonderful, fluffy crumb that’s not too delicate – it stands up to the frosting well. And that frosting! It’s absolutely wonderful. Not going to lie, the cake trimmings from leveling the cake and the extra frosting went together pretty nicely when I was in the mood for a sweet snack. I’m sure this is the cake recipe that will replace our standby!
Yellow Birthday Cake with Fluffy Chocolate Ganache Frosting
Ingredients
For the cake:
- 1½ cups 3 sticks/342g unsalted butter (room temperature)
- 2 cups 400g granulated sugar
- 3 eggs
- 3 egg yolks
- 1 teaspoon vanilla extract
- 3 cups 360g cake flour
- 1 teaspoon baking powder
- ½ teaspoon baking soda
- ½ teaspoon kosher salt
- 1 cup 240g nonfat buttermilk
For the chocolate ganache frosting:
- 12 ounces 340g semisweet chocolate (finely chopped)
- 1 cup 240g heavy cream
- 1 cup 2 sticks/228g unsalted butter (room temperature)
- 1 cup 140g confectioners’ sugar
- ¼ teaspoon kosher salt
- ½ teaspoon vanilla extract
Instructions
For the cake:
- Position a rack in the center of the oven, and heat the oven to 350 degrees. Butter and flour two 8-inch round cake pans.
- Using a stand mixer fitted with the paddle attachement (or a handheld mixer), cream together the butter and granulated sugar on medium speed for 3–4 minutes, or until light and fluffy. Use a rubber spatula to scrape the sides and bottom of the bowl a few times.
- In a small bowl, whisk together the eggs, egg yolks, and vanilla. On low speed, slowly pour the egg mixture into the butter mixture and mix until incorporated. Scrape the bowl and paddle again, then beat on medium speed for 20–30 seconds, or until the mixture is homogeneous.
- In a medium bowl, sift together the flour, baking powder, baking soda, and salt. On the lowest speed, add about one-third of the flour mixture to the egg-butter mixture and mix just until barely combined. Immediately pour in about half of the buttermilk and continue to mix on the lowest speed until the buttermilk is almost thoroughly incorporated. Stop the mixer and scrape the sides and bottom of the bowl well. Again on the lowest speed, add about half of the remaining flour mixture and mix just until barely combined. Add the rest of the buttermilk and mix just until combined. Be careful not to overmix.
- At this point, it is best to finish the mixing by hand. Remove the bowl from the mixer stand and, using the rubber spatula, fold in the remaining flour mixture just until the batter is homogeneous. As you fold, be sure to incorporate any batter clinging to the sides and bottom of the bowl. Divide the batter evenly between the prepared cake pans.
- Bake for 40–50 minutes, or until the tops are golden brown and the cakes spring back when pressed in the middle with a fingertip. Let cool completely in the pans on wire racks. (The cooled cakes can be tightly wrapped in plastic wrap and stored in the freezer for up to 1 week. Thaw at room temperature, still wrapped tightly in plastic wrap.)
For the chocolate ganache frosting:
- While the cake layers are cooling, put the chocolate in a medium heat-proof bowl. In a small saucepan, scald the cream over medium-high heat (bubbles start to form around the edge of the pan, but the cream is not boiling). Pour the hot cream over the chocolate and let sit for about 1 minute, then slowly whisk together the chocolate and cream until the chocolate is completely melted and the mixture is smooth. Let sit at room temperature for 1–2 hours, or until competely cool. (Or, refrigerate the ganache until cool, about 30 minutes, whisking every 10 minutes).
- Fit the stand mixer with the paddle attachment (or use a handheld mixer) and beat the butter on medium-low speed for 10–15 seconds, or until smooth. Add the confectioners’ sugar, salt, and vanilla and continue to beat on medium-low speed for about 2 minutes, or until the mixture is fluffy and smooth. Stop the mixer a few times and use a rubber spatula to scrape the bowl and the paddle to release any clinging butter or sugar. On medium speed, add the cooled ganache and beat for about 2 minutes, or until completely combined. Stop to scrape the sides and bottom of the bowl. Turn up the mixer speed to medium-high and beat for about 1 minute, or until the frosting lightens in color and thickens. You should have about 4 cups. (Use the frosting the day you make it, or cover and store in the refrigerator for up to 1 day, then bring to room temperature and paddle again for a few minutes until smooth before using.)
- Remove the cooled cakes from their pans. (Be sure they are completely cool. If they are even the slightest bit warm, the frosting will melt and you will have a mess.) Using a long, serrated knife, trim the top of each cake to level it (the layers will have rounded a bit in the oven; the trimmed scraps make great nibbles). Place one cake layer on a cake plate or cake pedestal (if you have a revolving cake stand, use it). Spoon about 1 cup of the frosting on top and use an offset spatula to spreada it evenly to the edges.
- Carefully place the second cake layer, top-side down (so the even, sharp edges will be on the top of the finished cake), on top. Spoon about 1 cup of the frosting on top and spread it over the top and down the sides of the cake, smoothing the frosting as well as you can and covering the entire cake with a thin layer. This is the crumb coat that will keep any loose crumbs from migrating to the surface of the finished cake. Spoon a heaping cup of frosting on top of the cake, and spread it evenly across the top and down the sides. This is the finishing layer of frosting. If desired, spoon any remaining frosting into a pastry bag fitted with a small round or star tip and pipe a decorative line along the top and/or bottom edge of the cake.
- The cake can be stored in an airtight container at room temperature for up to 2 days.

There is just something about a classic cake! Your pictures make me want to reach in a grab a fork!
Thanks! It’s such a classic combo, and so delicious!
Simple, yet colorful and so festive. I love the sprinkles! Birthdays wont be complete without them. =)
Beautiful photos!! And definitely a yummy cake. I’m sure your mom loved it! :)
That’s absolutely gorgeous! What a sweet gesture for your mom :)
Hi! I am planning to make this for my friend’s birthday. Is it ok if I were to make the batter the previous day, cover and refrigerate? Will the cake still turn out the same? Thanks! :)
To be honest, I have no idea! I think it would be better to bake them the day before and wrap them tightly in plastic wrap. They’ll stay pretty fresh that way!!
The simplest flavors together make the best cakes. It looks great, beautiful pictures! I love the book Flour
Terrific recipe for yellow cake. I am a pretty experienced baker and have made yellow cake a few times from verious recipes. You have really nailed it with this one.
thanks a bunch
This cake is mind-blowing STUNNING, Rachel! I’m in love with that gorgeous fluffy ganache frosting. This cake looks perfect for any brithday party! :) Pinned!
Looks delicious! Would this recipe work well for cupcakes also? Would you adjust the bake temp/time?
Hi Jennifer, I haven’t tried this particular recipe as cupcakes but I’m sure it would work well! Keep the temp the same, but adjust the baking time to about 18-22 minutes or until a toothpick inserted into the center comes out clean. Enjoy!
This cake is delicious and received lots of compliments, but my frosting turned out a bit darker and shinier and did not hold its shape as well, it did not fall off of the cake like if the cake had not cooled, but was just very loose when cutting and eating the cake. Any ideas on why that would have happened?
Hi Ariana, did you let the frosting cool completely before whipping it and frosting? It should’ve been almost truffle-like once cooled. If it was whipped/spread too early and not chilled after that, it would’ve been runnier, like you described.