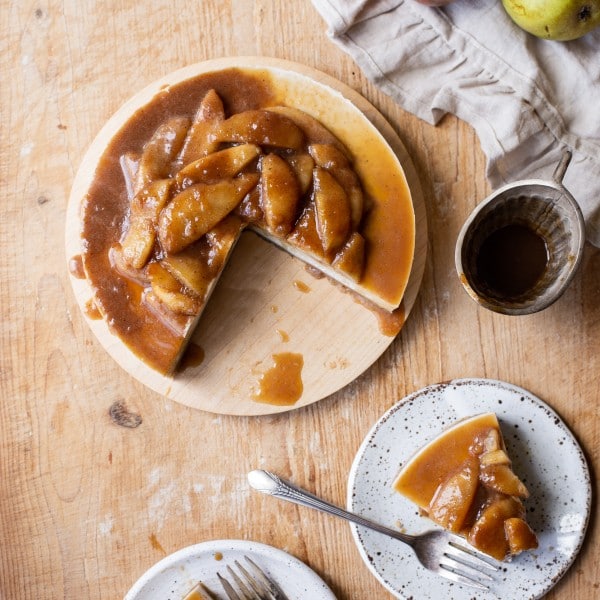
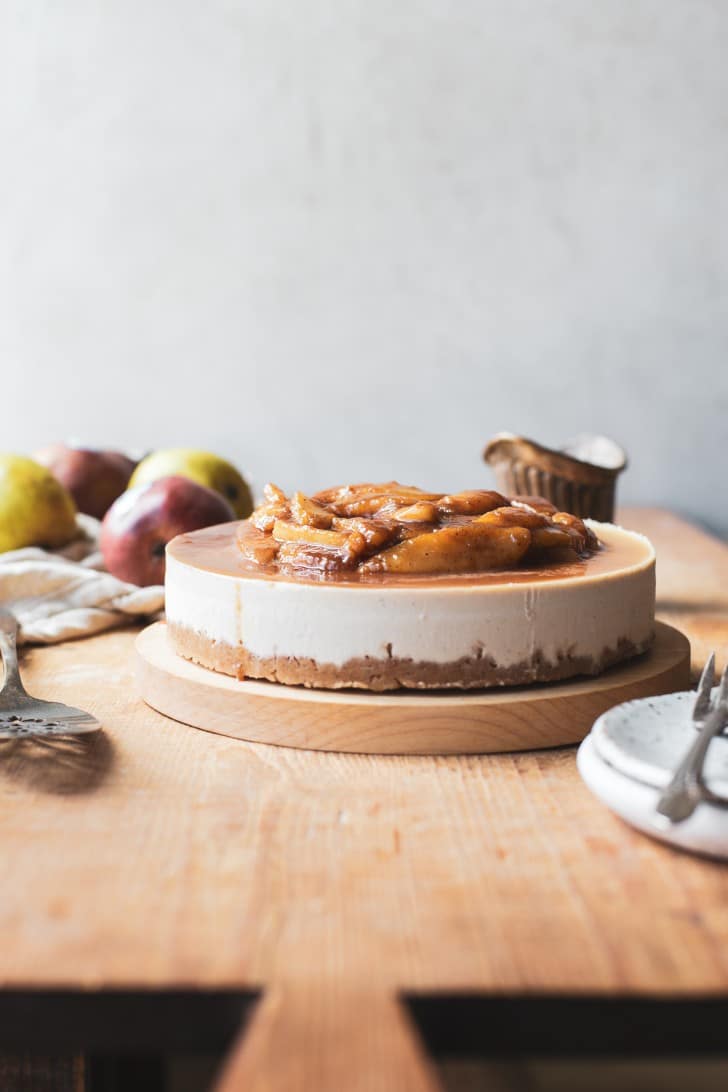
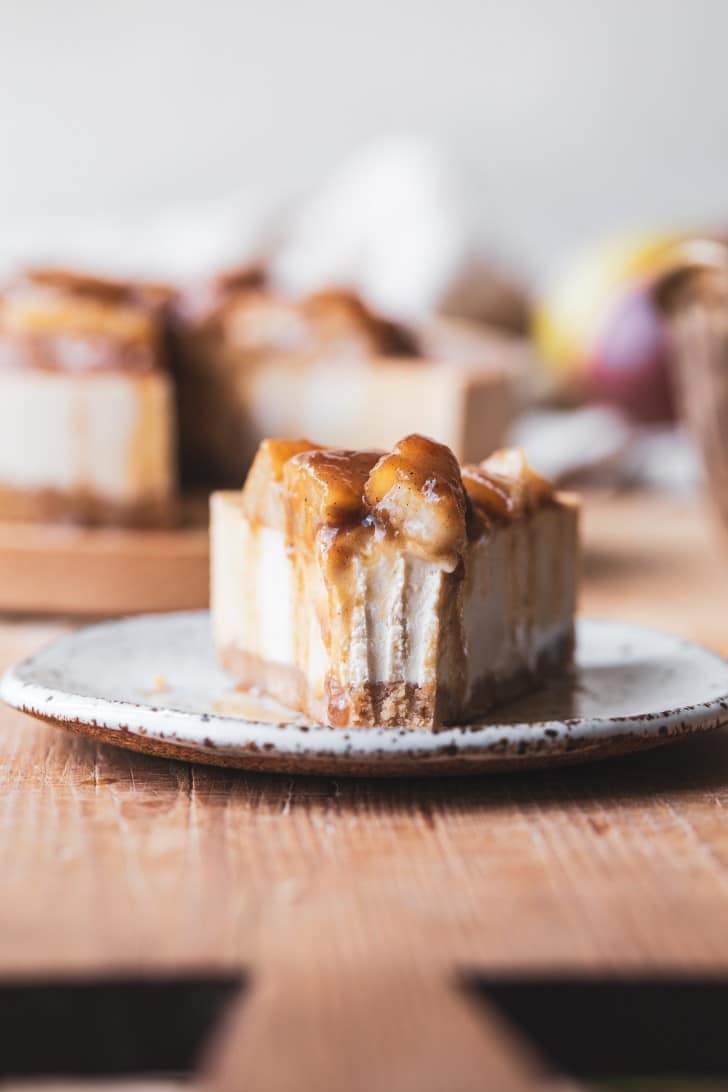
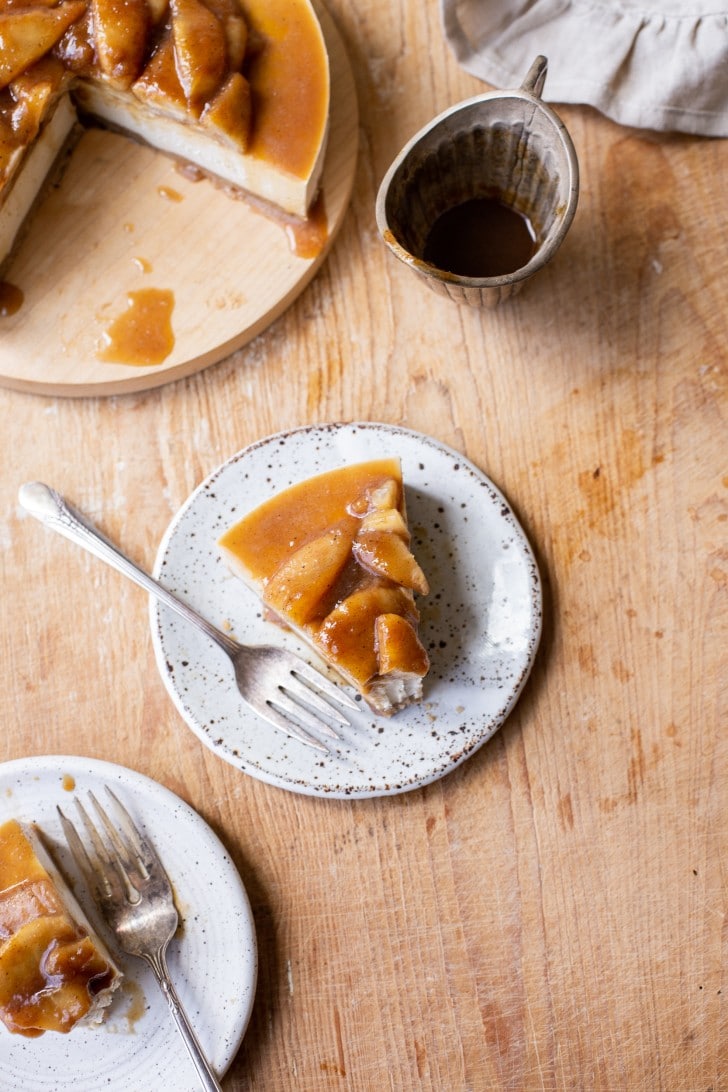
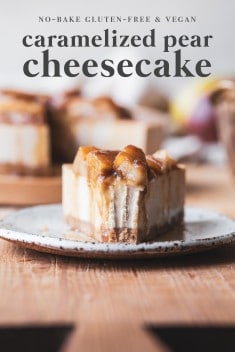
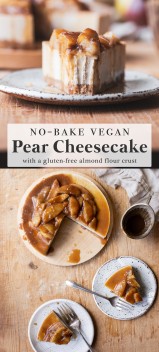
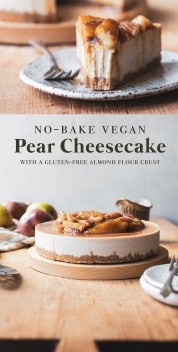
This No-Bake Vegan Pear Cheesecake has a simple gluten-free almond flour crust, a luscious vanilla bean cheesecake, topped off with an easy-to-make caramelized pear topping! It’s delicious, beautiful, and perfect for special occasions. Made in partnership with USA Pears!
I’m just going to say it: pears don’t get enough love! Don’t get me wrong, I have a number of pear recipes on this website that make me swoon…just look at this caramel pear crisp, these apple cider poached pears in puff pastry, and this apple pear crisp. But so often, they’re underappreciated in the dessert world, despite their juicy, tender deliciousness that works perfectly in so many recipes, both sweet and savory! There is not much that beats biting into a perfectly ripe, juicy pear…
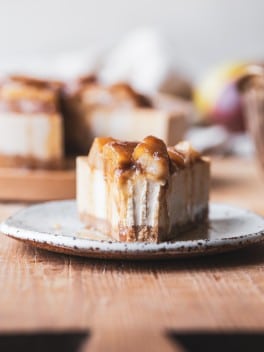
So, we’re embracing pears wholeheartedly with this no-bake vegan pear cheesecake. The incredibly delicious caramelized pear topping is a major standout that you’ll be wanting to put on everything. I wouldn’t blame you for making a double batch of this goodness to put on your oatmeal, your cakes, your ice cream…or just eat it with a spoon.
Is vegan cheesecake hard to make?
No, it’s not! I find it actually way easier to make than a traditional cheesecake – especially when you’re doing a no-bake cheesecake like this one! No special tricks are needed to avoid cracking or using water baths here.
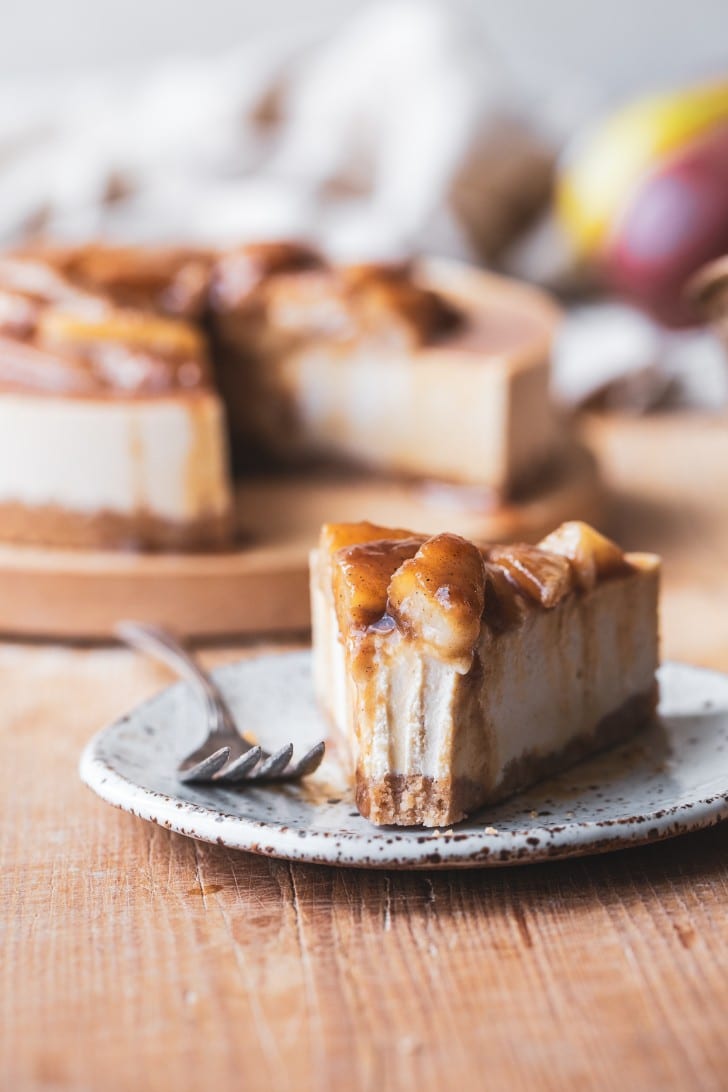
To make the crust, you’ll simply stir the almond flour, coconut oil, maple syrup, cinnamon, and salt together in a bowl until combined, then you’ll press it evenly into the bottom of your pan.
For the vanilla bean cheesecake filling, we use soaked cashews as the base. To make it, you’ll blend the softened cashews with canned coconut milk, maple syrup to sweeten, coconut oil (which helps the cheesecake firm up), lemon juice (which adds that cheesecake-y tartness), and salt and vanilla for flavor.
The filling usually takes a few minutes to blend in a high-speed blender. Once it’s done, you’ll have a silky smooth and delicious cheesecake filling. Just pour it on top of the crust and tap it hard a few times against the counter to pop any air bubbles. Then, place it in the refrigerator or freezer to firm up.
Let’s get into that caramelized pear topping…
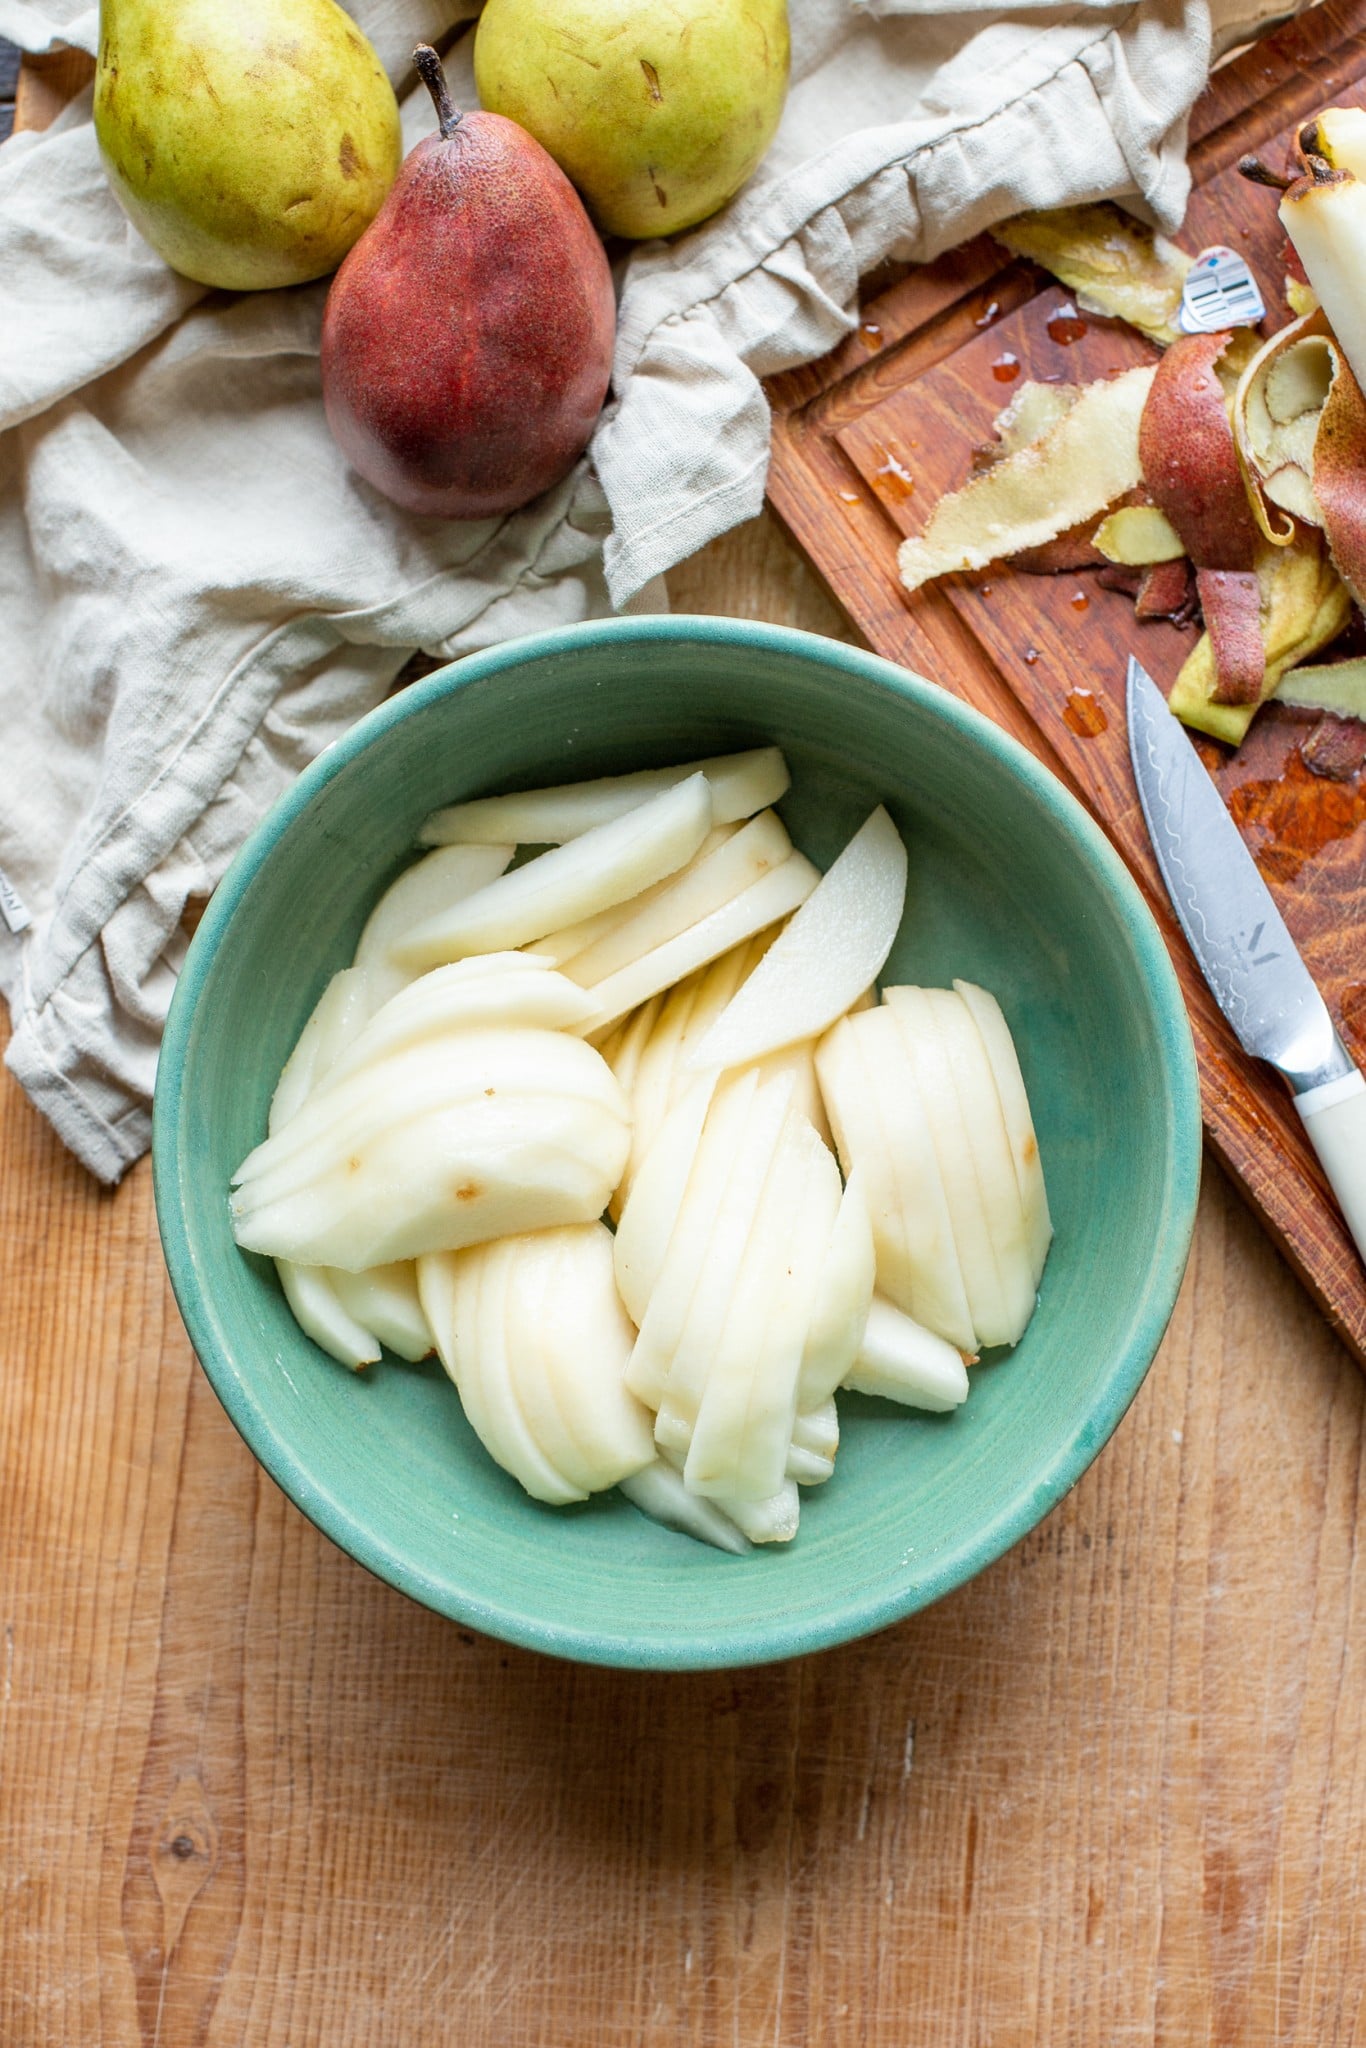
There are so many fantastic varieties of pears, but for this recipe, I used USA-grown Anjou pears – both the red Anjou and green Anjou varieties! They are so delicious, easily accessible, and super juicy, which works so well with this caramelized pear reduction since the juices release a bit to help create a fantastic pear-scented caramel sauce.
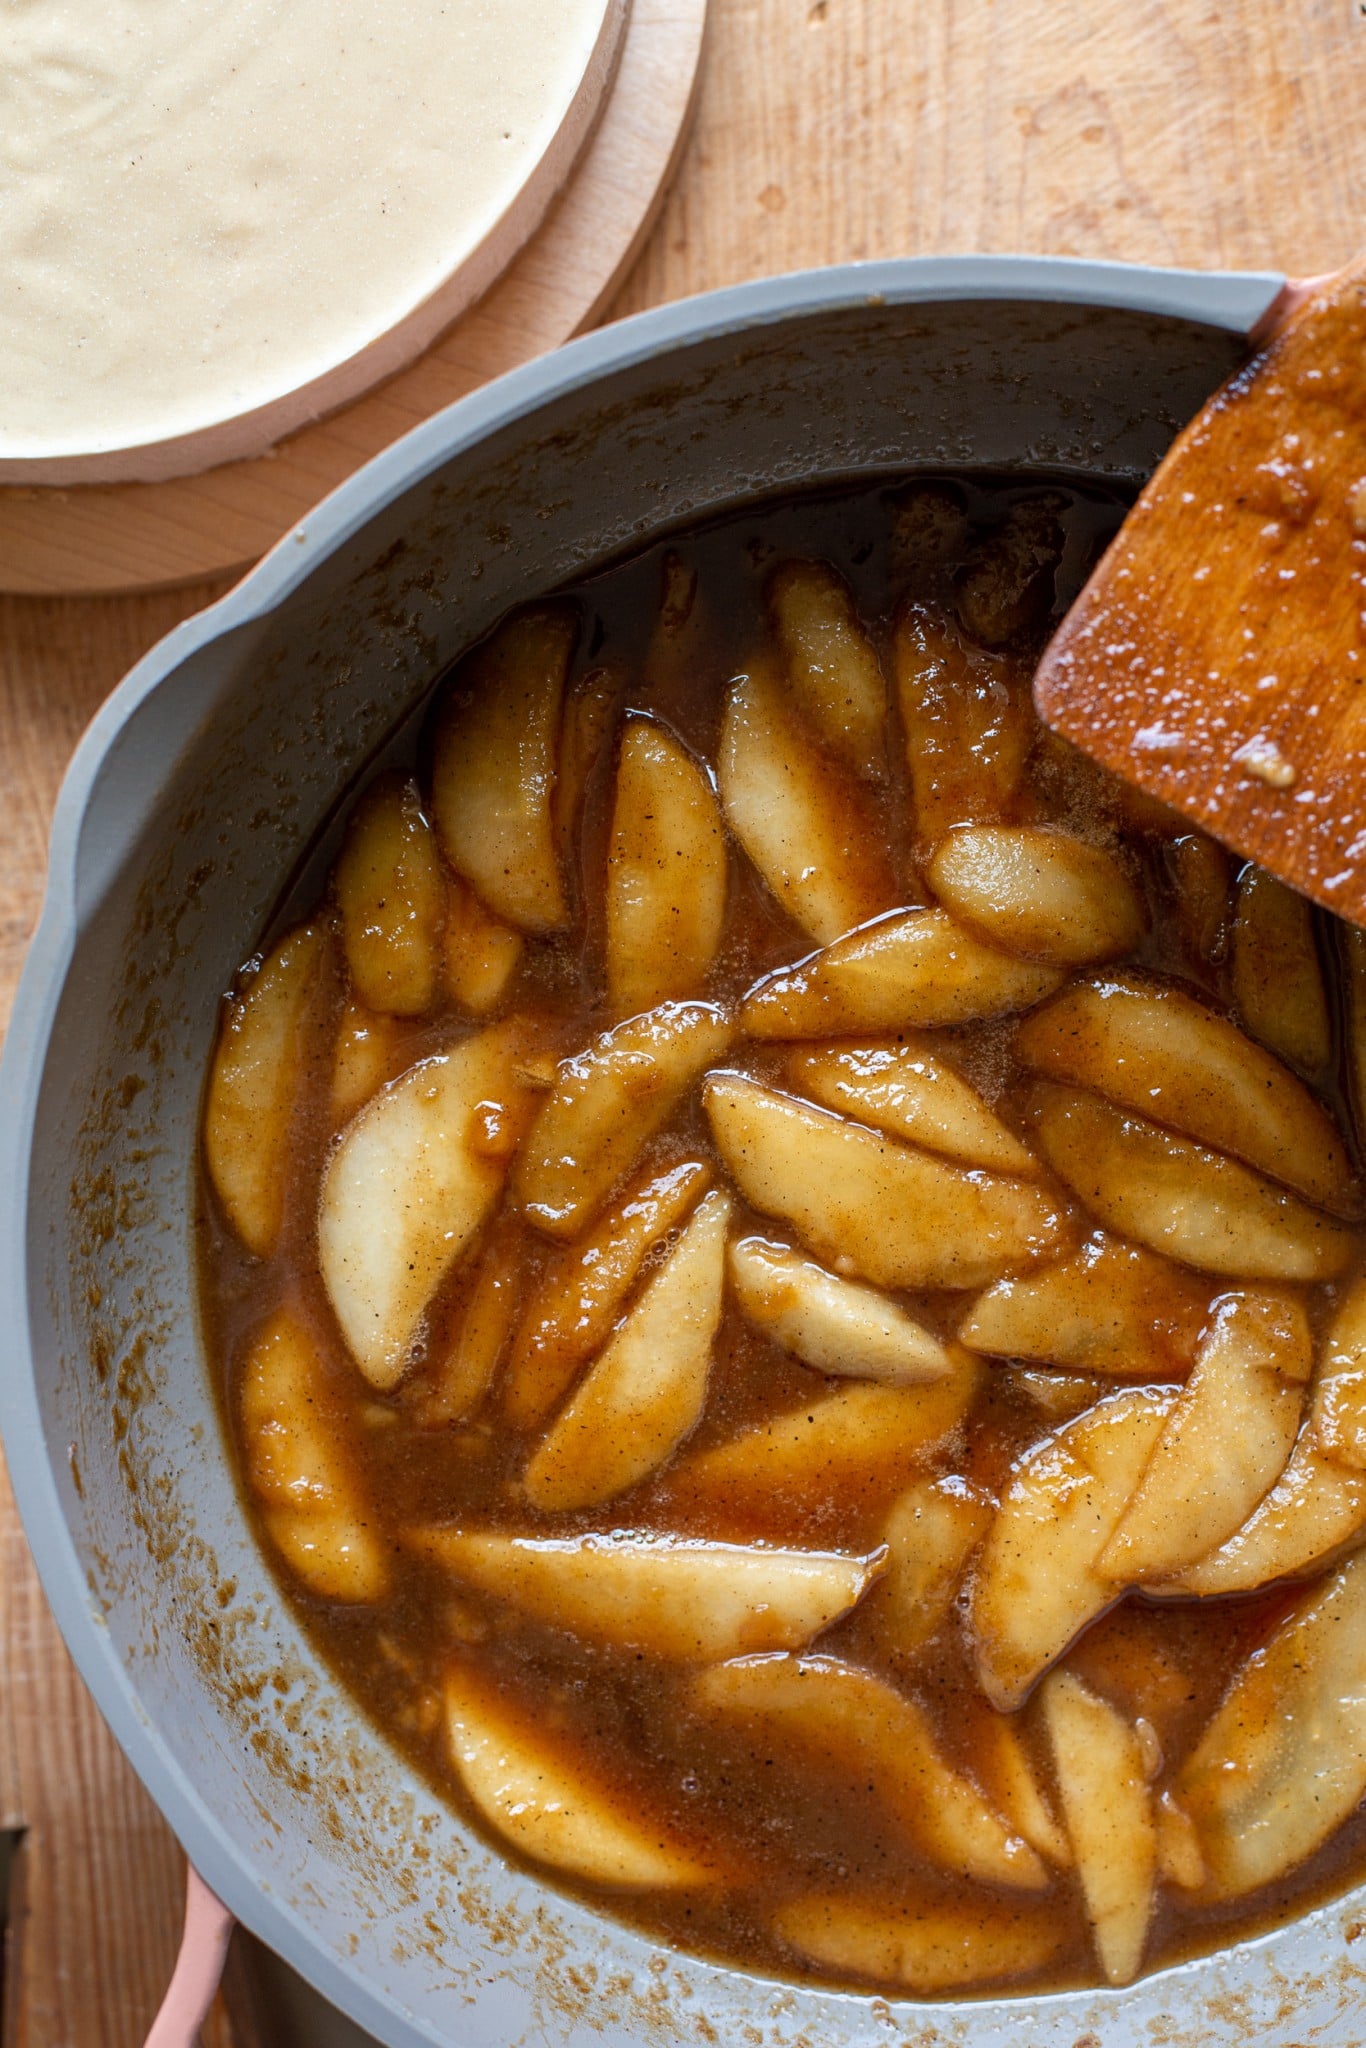
The caramelized pear topping comes together in about 10 minutes too. To make it, you’ll melt your fat – I used vegan butter, but coconut oil will also work. Then, you’ll add in the pears. You can choose to do sliced pears, as I did, or chop the pears into chunks.
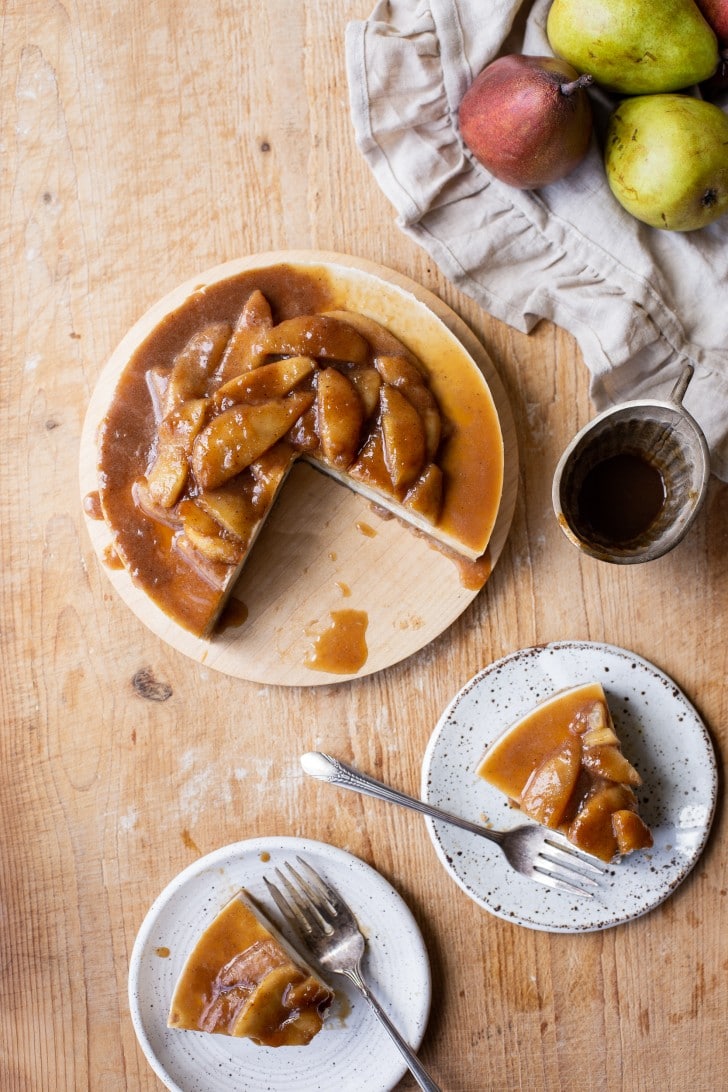
Sprinkle coconut sugar over the pear mixture, along with a pinch of salt, and let simmer for about 5 minutes, taking care not to stir too much, as you don’t want to break the pears up too much. Once they’re softened but not falling apart, remove them from the heat and add some vanilla extract. Let cool slightly, then spoon the pears over the top of the cheesecake. You’ll likely have caramel sauce remaining in the pan – I love putting that into a small jar to drizzle over your cheesecake.
Have extra caramelized pears? These don’t need to be limited to this cheesecake! They also made a fabulous topping for oatmeal, ice cream, simple cakes, or just for eating with a spoon!
How to store pear cheesecake
If you want to make this recipe ahead of time, you can make the cheesecake portion up to 5 days ahead and keep it stored in the freezer. I would recommend making the caramelized pear topping the day of serving for the freshest, most delicious result. I love adding the warm topping to the chilled cheesecake for a fantastic combination of flavors, textures, and temperatures.
If you would like to make the pear topping ahead of time, you can make it up to one day ahead of time. Keep it stored separately from the cheesecake portion and add it just before serving, warming it up slightly if desired.
Once assembled, I would keep the pear cheesecake stored in an airtight container in the refrigerator for up to three days so the topping doesn’t freeze. This will allow the cheesecake to stay soft for slicing and serving, too. Enjoy!!
Craving more cheesecake goodness?
- Chocolate Peanut Butter Cup Vegan Cheesecake
- Baked Vegan Cheesecake
- No-Bake Layered Blueberry Cheesecake
- Baked Chocolate Vegan Cheesecake
- No-Bake Vegan Lemon Cheesecake
No-Bake Vegan Pear Cheesecake
Ingredients
For the crust
- 1 cup (96g) almond flour
- 2 tablespoons (42g) maple syrup
- 2 tablespoons (25g) coconut oil
- 1 teaspoon cinnamon
- ¼ teaspoon kosher salt
For the cheesecake filling
- 2 cups (240g) raw cashews, soaked in water for at least four hours or preferably overnight, drained, and rinsed before using
- ½ cup (120g) canned coconut milk, shaked
- ¼ cup (50g) coconut oil, melted and cooled
- ⅓ cup (111g) pure maple syrup
- 2 tablespoons fresh lemon juice
- 1 tablespoon vanilla extract, or 1 teaspoon vanilla bean powder
- Pinch of salt
For the pear topping
- 4 medium Anjou pears
- 2 tablespoons coconut oil, or vegan butter
- ¼ cup coconut sugar
- 1 teaspoon vanilla extract, and/or ¼ teaspoon vanilla bean powder
- Pinch of salt
Equipment
Instructions
- Grease a 6” springform pan with coconut oil, or line an 6” cake pan with strips of parchment paper for easy removal, and grease well with coconut oil. Set aside.
- Stir together the almond flour, maple syrup, coconut oil, cinnamon, and salt and mix until smooth. Press the dough evenly along the bottom of the prepared pan.1 cup (96g) almond flour, 2 tablespoons (42g) maple syrup, 2 tablespoons (25g) coconut oil, 1 teaspoon cinnamon, ¼ teaspoon kosher salt
- In a food processor or high-powered blender (I use my Vitamix, but most powerful blenders should do the job), combine all of the filling ingredients and blend for about 2 minutes, or until the mixture is silky smooth and creamy. Scrape down the sides as necessary. You may need to add a bit more coconut oil or lemon juice to get it to blend smoothly if your blender isn’t super high-powered.2 cups (240g) raw cashews, ½ cup (120g) canned coconut milk, ¼ cup (50g) coconut oil, ⅓ cup (111g) pure maple syrup, 2 tablespoons fresh lemon juice, 1 tablespoon vanilla extract, Pinch of salt
- Once it’s smooth, taste the mixture and adjust the sweetness/tartness levels, if desired.
- Pour the filling into the prepared pan over the crust. Smooth out the top and tap the pan hard against the counter a few times to release any air bubbles. Place in the freezer for at least three hours to set, or in the refrigerator for at least eight hours to set.
- To make the pear topping, heat the coconut oil or butter in a saute pan over medium-low heat. Add the pears, and then sprinkle with coconut sugar. Mix slightly and cook for five to ten minutes, or until the coconut sugar has dissolved into a caramel sauce and the pears have released some of their juices. They should be softened but not falling apart. Remove from the heat and add the vanilla and salt. Let cool until lukewarm, and then spoon over the top of the set cheesecake if you’re ready to serve. If not, store separately from the cheesecake until you are ready to serve.4 medium Anjou pears, 2 tablespoons coconut oil, ¼ cup coconut sugar, 1 teaspoon vanilla extract, Pinch of salt
- If storing in the freezer, let the cheesecake thaw in the refrigerator for a few hours before serving or let thaw at room temperature for 30 minutes before serving. I recommend running your knife under hot water to warm it up before cutting the cheesecake with the still-hot (dried) knife for the cleanest cuts.
- Store leftovers tightly wrapped in the freezer (3 months) or refrigerator (5 days).

Girl, you’re a G_E_N_I_U_S!!!! I mean that looks and sounds heavenly and it is made with whole, healthy, wonderful ingredients!!!
Waiting for the whole30 to be over in order to try it out!! Thank you for everything you create <3
I hope you love it, Luci!!
Really delicious recipe. We loved it, so yummy!!! It’s really awesome.
So glad you loved it, David!
Thankyou for the inspiration, pears are underrated for sure…This looks really amazing yet simple to make! I love raw foods and typically do my desserts raw, wondering how I can make the pears without heating them up…hhmmmm.
Hi Alicia! You could do a no-cook caramel sauce (like the one in this recipe) and toss the pears in that for a raw topping :)
Hi Rachel, this looks amazing and I want to make it but want to make it larger than 6″. Any chance you know the amounts for making a 9″ round version? Or have a formula so I can do the math? :)
Hi Meghan, the area for a 9″ pan is almost 2.5x the area of a 6″ pan (28 to 63) but you could probably just double it. It may be a little bit thinner but should be great regardless! The height different will likely be marginal.
Wonderful!!! OMG thank you so much for this delicious and healthy recipe. Love it !!!
So glad you’re loving it, Elvia!
Hi, have you done a vanilla cheesecake with a walnut base, and almond base?
As you have a vanilla cheesecake recipe which has a walnut base?
And both vanilla?
Hi Antonia, I’m not sure what you mean? You can use the crust recipes interchangeably with any of the cheesecake fillings.
Hi Rachel, with what other nuts can I substitute the cashews?
I haven’t tried with any other nuts, so I can’t confidently recommend anything else. You could try sunflower seeds, macadamia nuts, or another soft nut, but they’ll all impart their own flavor.
It was super easy to make and very nice and creamy!! It didn’t really have a cheesecake flavor, but that was to be expected. I made a apple topping with 4 apples and used a 9-inch cake pan. I had to do half a recipe more crust because of the larger pan. Mine didn’t set overnight in the fridge so I put it in the freezer and then thawed it on the counter and it worked well!
So glad you’re enjoying it, Anna. Thanks so much for the feedback and recipe tips!
Excellent recipe, loads of flavour, creaminess and tasty pear caramel. Everyone loved it, thank you
So happy to hear that!!