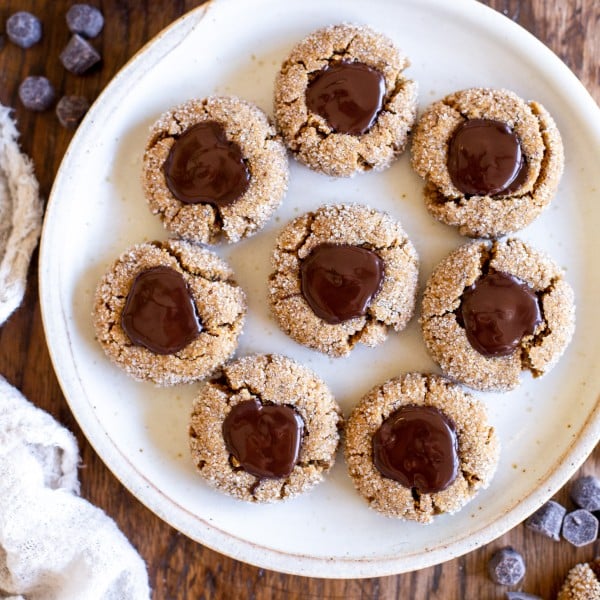
These Vegan Peanut Butter Blossoms are a plant-based, gluten-free twist on the classic cookie! We use dark chocolate to create the classic “kiss” in the center.

It’s no secret I am a fiend for all of the peanut butter recipes. You know it’s true, since this is the second peanut butter cookie recipe I’ve posted in a row :). I’ve been a full on peanut butter obsessed person for my entire life, and when it’s paired with chocolate?? Even better.
Peanut butter blossoms are a classic for a reason: a simple peanut butter cookie, pressed with a chocolate kiss. They’re easy, totally delicious, and always a staple around the holidays, though they’re good enough to be enjoyed all year round.
The problem with making them vegan is…there are NO vegan chocolate kisses! Luckily, we remedy that problem, and while it may not look exactly the same as the classic kiss version, you get all the peanut butter + chocolate goodness, and that’s the important thing!

How to make vegan peanut butter blossom cookies
To make the cookies, you’ll need just a few ingredients:
- Coconut Oil: I like using refined so there isn’t a strong coconut flavor.
- Peanut Butter: I used a natural peanut butter made of just peanuts and salt. You can substitute sunflower seed butter to make a nut-free version!
- Coconut Sugar: plus more to roll the cookies in!
- Flax Eggs: instructions for how to make these are in the ingredients list in the recipe card.
- Vanilla Extract
- Baking Soda & Salt: skip the salt if used a salted peanut butter.
- Coconut Flour: this is super absorbent so we don’t need a lot of it. Use 3x the amount if substituting almond flour.
Making these peanut butter blossoms is very straight forward if you’re used to making cookies.
- Beat together the coconut oil, peanut butter, and coconut sugar until smooth.
- Add in the flax eggs and vanilla extract.
- Stir in the baking soda, salt (if using), and coconut flour.
- Roll dough balls in sugar and bake for 10 minutes.
- Add the chocolate and let melt a bit!
- Set in the refrigerator to firm up the chocolate. Enjoy!


How do we make vegan chocolate kisses?
Instead of using a Hershey’s kiss, as a classic peanut butter blossom would, we use dark chocolate! I used Hu Kitchen Gems (use code BAKERITA for 20% off!) and pressed three of them into the center of each still-warm-from-the-oven cookie. Once they melted a bit, I used a toothpick to swirl the chocolate around.
You can use any dark chocolate you love – a square of chocolate works too. I didn’t care about these looking exactly like a traditional peanut butter blossom, so I didn’t mind the melty chocolate – which ends up making these even more chocolatey!
If you want it to look just like a classic peanut butter blossom, you can make your own by melting chocolate and setting it in a Hershey’s Kisses-shaped mold!

How to store peanut butter blossoms
At room temperature: you can keep these in an airtight container at room temperature for up a week, but they’ll taste the freshest in the first few days!
In the refrigerator: store in an airtight container for up to a week.
In the freezer: store in an airtight container in the freezer for up to a year. Separate the layers with parchment or wax paper to ensure they don’t stick together. Thaw at room temperature or in the fridge before serving.
Want more peanut butter cookies?
- Chewy Gluten-Free Peanut Butter Snickerdoodles
- Peanut Butter Oatmeal Raisin Cookies
- Soft Peanut Butter Oatmeal Cookies
- Peanut Butter Chocolate Chip Cookies
Vegan Peanut Butter Blossoms
Ingredients
- 2 tablespoons (25g) coconut oil, solid and slightly softened, similar to softened butter
- ½ cup (122g) peanut butter, use sunflower seed butter for a nut-free cookie
- ½ cup (77g) coconut sugar
- 2 flax eggs, 2 tablespoons flax meal + 5 tablespoons water – whisk them together and let sit for 5 minutes to gel
- 1 teaspoon vanilla extract
- ½ teaspoon baking soda
- ½ teaspoon salt, skip if you’re using salted peanut butter
- ½ cup (64g) coconut flour
- ⅓ cup cane or coconut sugar, to roll cookies in
- ½ cup chocolate chips or chocolate squares, I used 3 Hu Kitchen Gems on each cookie
Instructions
- Preheat the oven to 350ºF and line a cookie sheet with parchment paper.
- In a bowl or stand mixer, beat together the coconut oil, peanut butter, and coconut sugar until smooth. Add the flax eggs and vanilla and mix until smooth.2 tablespoons (25g) coconut oil, ½ cup (122g) peanut butter, ½ cup (77g) coconut sugar, 2 flax eggs, 1 teaspoon vanilla extract
- Add the baking soda, salt, and coconut flour to the wet ingredients. Mix until well incorporated.½ teaspoon baking soda, ½ cup (64g) coconut flour, ½ teaspoon salt
- Place the cane sugar in a small bowl to roll the dough in.⅓ cup cane or coconut sugar
- Use a medium sized cookie scoop to form cookies and roll in the sugar. Place 2” apart on the prepared baking sheet. Press down slightly to flatten – note that the cookies won’t spread very much, so press them down to the thickness you prefer.
- Bake for 10 minutes or until the cookies have puffed and are cooked through. You can bake for an extra minute or two for crispier edges. As soon as they’re out of the oven, press the chocolate into the cookies.½ cup chocolate chips or chocolate squares
- Let cool for 5 minutes on the cookie sheet and then move to a cooling rack to cool completely, or place in the fridge or freezer to firm up the chocolate. Enjoy!
Notes
How to store
- At room temperature: you can keep these in an airtight container at room temperature for up a week, but they’ll taste the freshest in the first few days!
- In the refrigerator: store in an airtight container for up to a week.
- In the freezer: store in an airtight container in the freezer for up to a year. Separate the layers with parchment or wax paper to ensure they don’t stick together. Thaw at room temperature or in the fridge before serving.

Rachel!!!! You out did yourself again! These peanut butter blossoms were such a hit, I had to make them twice in one day! Everyone who ate one, could not eat just one! Hence, I had to make them again just so I could have some! So tasty and moist, perfect amount of peanut butter in every bite! Thank you so much!
So glad you’re loving them, Paula!
Hi! If I want to use eggs in this recipe how many do I use? Thanks!
Hi Samantha, 1 regular egg should work here. Add an extra yolk if it seems like it needs more moisture. Enjoy!
Can you use almond butter instead of Peanut butter
Yes absolutely, any nut or seed butter will work.