
These Gluten-Free Bagels taste just like the ones from the bagel shop! These homemade gluten-free bagels are fluffy, tender, and perfectly chewy. Making bagels from scratch means you can customize with all of your favorites toppings! Store extras in the freezer to have bagels whenever you want. They’re vegan, too!

Welcome to gluten-free bagel wonderland! I’ve been making these on repeat recently, and I’m not getting sick of them. The flavor options are endless, and there’s nothing quite like a homemade bagel fresh out of the oven.
I recently posted this recipe for Gluten-Free Sourdough Bagels, but I know not everyone has or wants to maintain a sourdough starter. I also recently shared this super popular Homemade Gluten-Free Bread, and I knew I needed to marry the two recipes to create some kick-ass Gluten-Free Bagels, no sourdough starter necessary.
If you’d rather use your sourdough starter for bagels, pop over to that recipe for some amazing sourdough bagels.
These gluten-free bagels are…
- Perfectly baked and chewy on the outside
- Soft, tender crumb on the inside
- The perfect canvas for adding your favorite toppings
- Easy to make in a few hours
- Dairy-free & vegan
- Freeze so well so you can have bagels on demand!
Why do you boil bagels?
These gluten-free bagels are just like traditional bagels in that they need to be boiled before they are baked!
We boil the bagels in a baking soda bath, which alkalizes the water and helps increase the Maillard reaction. A Maillard reaction is what promotes browning and caramelization in the oven. A sugar, like honey or molasses, can also be used in the water mixture, and molasses is commonly used instead of baking soda. The sugars in molasses similarly help brown the bagels when they’re baked.
The boiling also helps develop that signature chewy bagel crust! Don’t skip it – the boiling is key to a traditional chewy bagel.
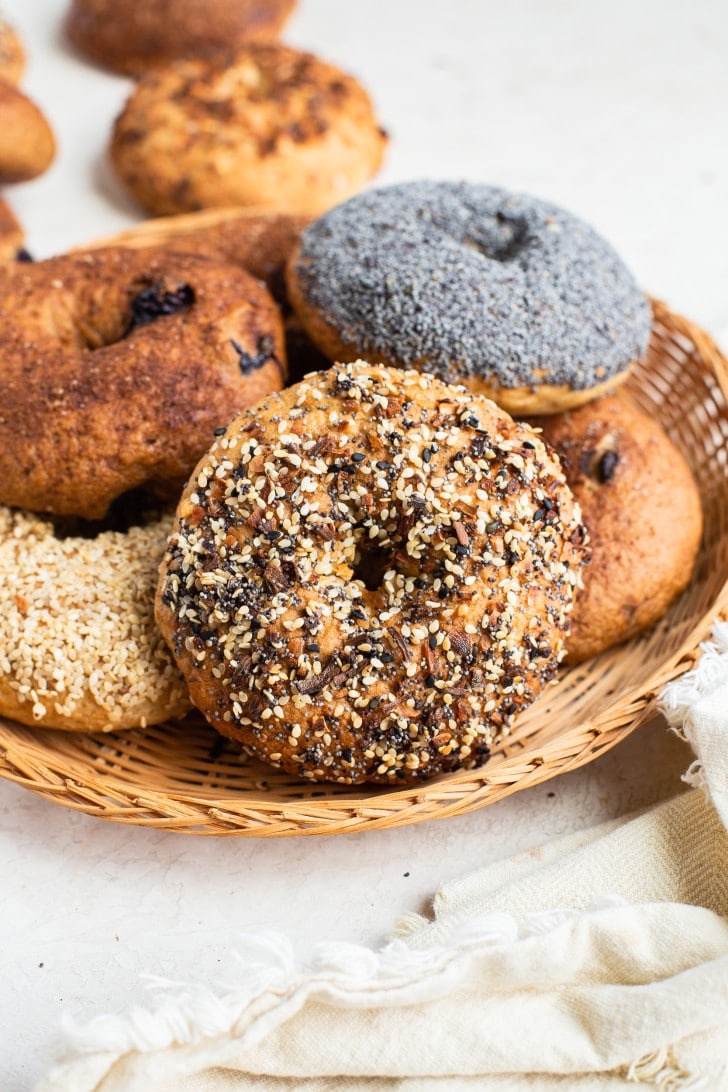
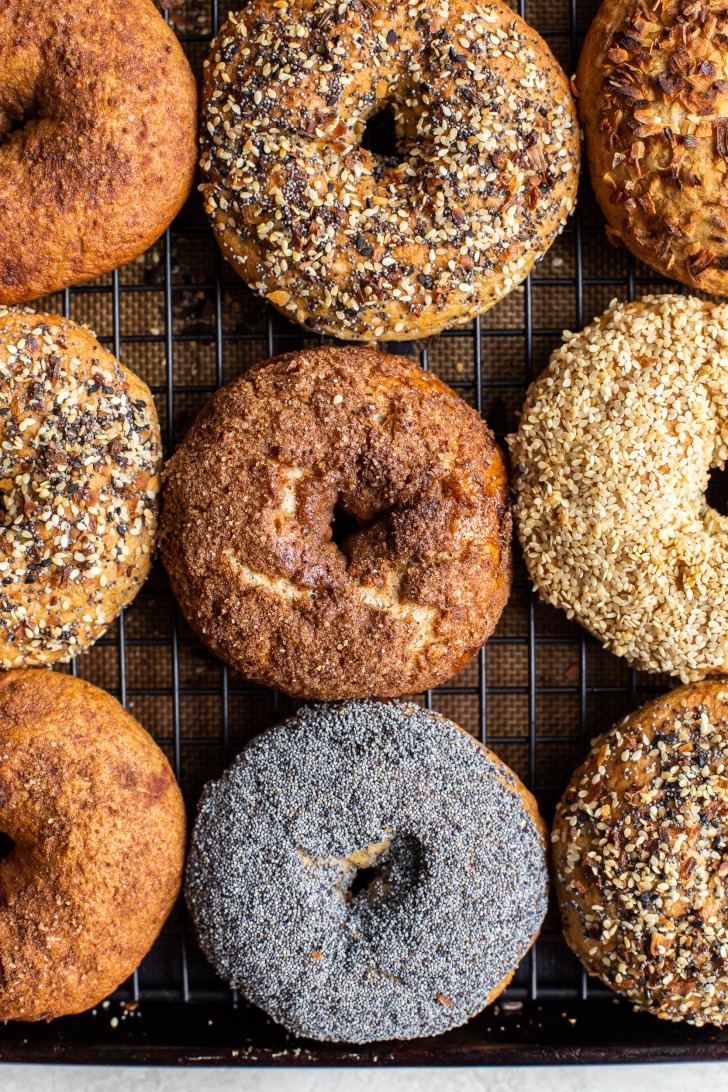
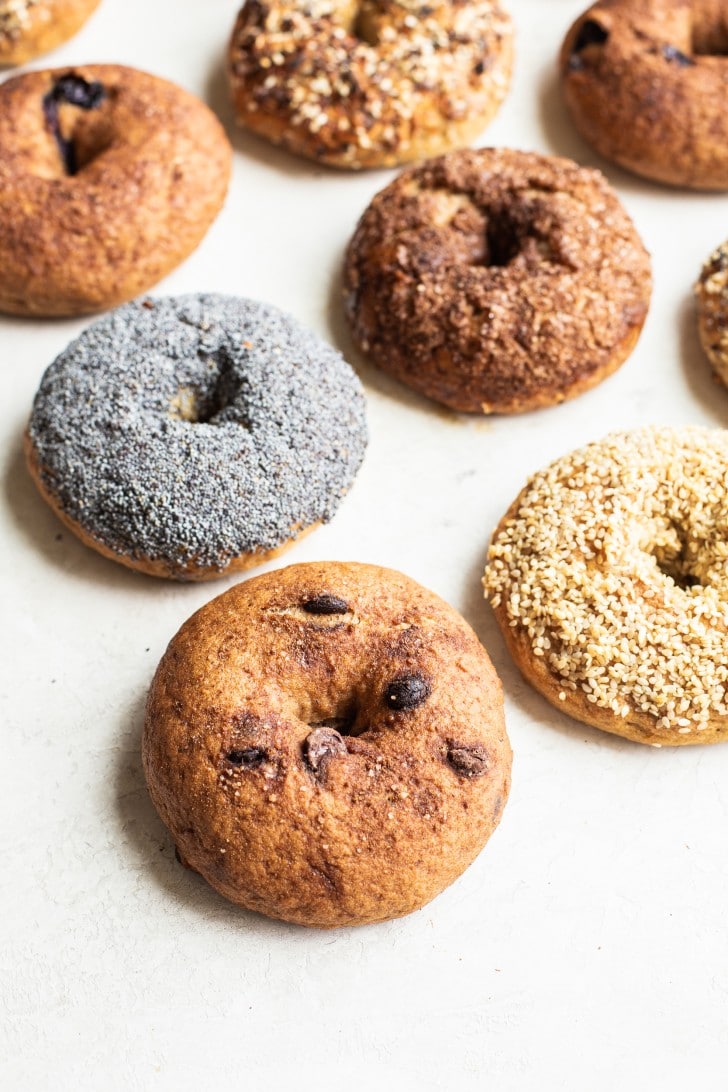
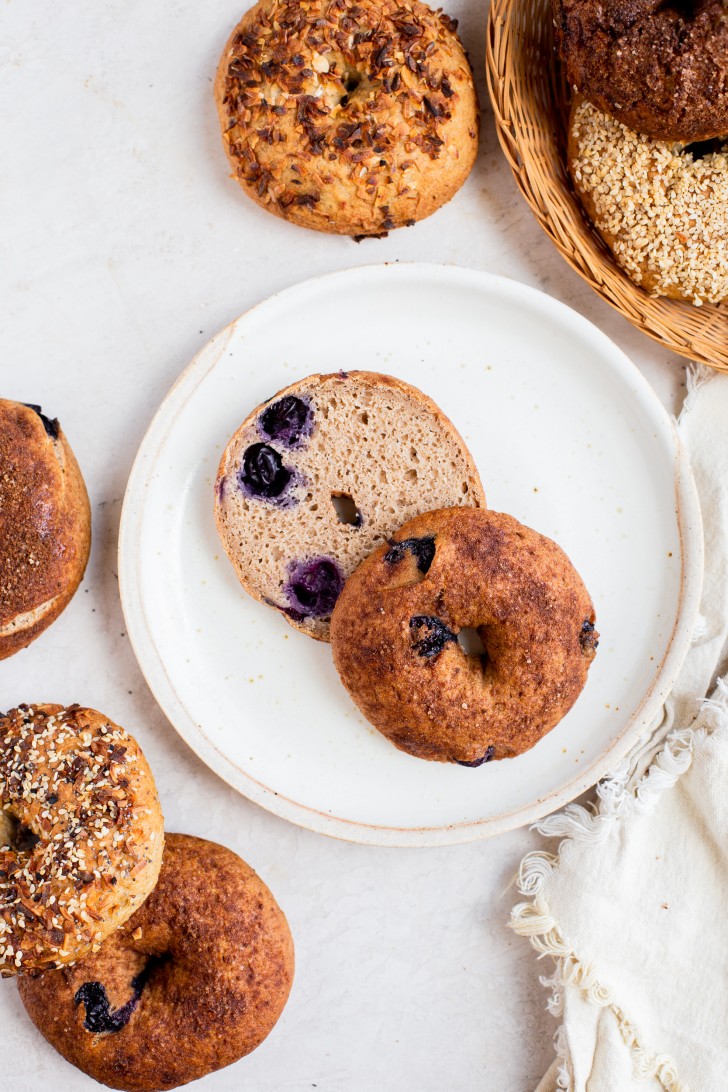
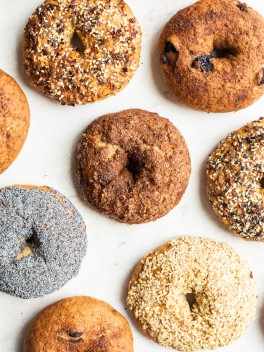
What bagel flavors can I make?
Really…the options are limitless! Use your creativity and you can recreate any of your favorite bagel flavors at home with this homemade gluten-free bagel recipe as the base. Here are some of the flavors that you see in the pictures, plus some other favorites.
Savory
- Everything
- Poppy Seed
- Sesame Seed
- Onion
- Cheese
- Jalapeno Cheddar
Sweet
- Cinnamon Sugar
- Blueberry
- Cinnamon Raisin
- Chocolate Chip
How to store gluten-free bagels:
To store, keep in an airtight bag or container for 2 to 3 days at room temperature. You can also slice them in half and store them in an airtight container in the freezer for up to 6 months.
Want more gluten-free bread recipes?
- Gluten-Free Sourdough Bagels
- Homemade Gluten-Free Bread
- Gluten-Free Sourdough Crackers
- Gluten-Free Sourdough Pizza Crust
- How to Make Gluten-Free Sourdough Bread
- Gluten-Free Sourdough Chocolate Chip Cookies
- Gluten-Free Sourdough Focaccia
Gluten-Free Bagels
Ingredients
To activate the yeast
- 7g (2.5 tsp) active dry yeast
- ¼ cup + 3 tablespoons (100g) warm filtered water
- 1 tablespoon (20g) maple syrup, , honey or cane sugar
For the loaf
- ¼ cup (20g) whole psyllium husk
- 1⅔ cup (375g) filtered water
- 1 tablespoon (15g) olive oil
- ½ cup (80g) potato starch
- 1/4 cup + 2 tablespoons (60g) tapioca flour, or arrowroot flour
- 1 cup (150g) sorghum flour
- 1 cup + 3 tablespoons (190g) brown rice flour
- 2 teaspoons (12g) sea salt
For the sweet version
- ¼ cup (45g) coconut sugar
- 1 teaspoon (3g) cinnamon
For the boiling mixture
- 1½ tablespoons baking soda
- 6 cups water
Equipment
Instructions
- In a small bowl, combine the yeast with the sweetener of your choice and warm water, between 100-110℉. It should feel warm, but not hot, to the touch. Let it sit to activate for about 10 to 15 minutes. You should notice it start to to bubble, and then it will get nice and foamy on top.7g (2.5 tsp) active dry yeast, ¼ cup + 3 tablespoons (100g) warm filtered water, 1 tablespoon (20g) maple syrup
- In a bowl or liquid measuring cup, mix together the psyllium husk, olive oil, and water. Whisk together, breaking up the psyllium, and let it set for a few minutes until it’s thickened and gel-like.¼ cup (20g) whole psyllium husk, 1⅔ cup (375g) filtered water, 1 tablespoon (15g) olive oil
- In a large mixing bowl or the bowl of your stand mixer, mix together all of your flours, starches, and salt. Whisk to combine. Also mix in the coconut sugar & cinnamon if you’ll be doing a sweet batch of bagels.½ cup (80g) potato starch, 1/4 cup + 2 tablespoons (60g) tapioca flour, 1 cup (150g) sorghum flour, 1 cup + 3 tablespoons (190g) brown rice flour, 2 teaspoons (12g) sea salt
- Add the psyllium gel and the activated yeast mixture to your dry ingredients. If using a stand mixer, fit it with the dough hook and let it mix up the dough until combined and smooth, scraping down the sides a few times during the process, and flipping the dough around to make sure it’s fully mixed on the bottom too. You can also do this process by hand. If doing it by hand, I like using a dough whisk to get it mostly combined, then, turn it out onto the countertop and use your hands to knead the dough and make sure all of the flour is incorporated.
- If you’re adding in any mix-ins, like blueberries or chocolate chips, gently knead them into the dough now.
- Bulk ferment the dough for 1 hour.I simply leave it in the mixing bowl, covered with a clean tea towel, to rise for one hour in a warm place. You should notice that the dough will just about double in size during the hour, and become nice and puffy.
- Punch down the dough to release the air bubbles, and then divide the dough into 8 equal pieces (approximately 122g each) and shape each piece into a bagel. I like to do this by rolling into a ball and then using my thumb to press a hole in the center, and then open the hole a bit more with my fingers. You can also roll the dough into a long piece and then seal the ends together.
- Place the bagels on a lined baking sheet and cover with a clean tea towel; let rise for 30 minutes to 1 hour or until slightly more puffy – you don't want these to overproof so watch them carefully.
- While the bagels rise, preheat the oven to 425℉ and get a big pot of water boiling.
- When the bagels have puffed up, add the baking soda to the boiling water and boil the bagels 1 or 2 at a time, depending on the size of your pot, for 30 seconds on each side. I use a spider to place the bagels in the water and remove them, as it allows excess water to drip off easily. Remove from the pot, letting the excess water drip off as much as possible, and place back down gently on the baking sheet.1½ tablespoons baking soda, 6 cups water
- Repeat for all bagels and add any toppings, like everything bagel seasoning, cinnamon sugar, or other seeds of your choice. Immediately place into the preheated oven.
- Bake for 30 minutes or until golden brown on top and crisp on the bottom.
- To store, keep in an airtight bag or container for up to 3 days at room temperature. You can also slice them in half and store them in an airtight container in the freezer for up to 6 months.

Excellent bagels and I seeded with Everything Bagel seasoning. Makes my one chilf who is GF extremely happy… and he loves the GF bread recipe as well.
So glad you’re loving it, Olivia!
Do you recommend cooling the bagels completely after baking before cutting into them? I follow that suggestion with your your bread recipe and it makes a huge difference, but maybe these don’t need that step? So happy to have found your recipes!
Hi Courtney, with the smaller breads I usually tear into one to eat it warm and it doesn’t seem to make as big as an impact with rolls/bagels as it does with the big loaves. I wouldn’t slice them all warm or anything but if you want to enjoy some warm bread, it won’t be super gummy or anything if you do. Enjoy and happy baking!
I made these today and they were looking good (good rise). However when I was doing the boil step, they started to fall apart in the water. Now they are flat after the bake. Any ideas on why that might be?
Hi Rae, was the dough cohesive before they went into the water (no cracks)? Or were the overproofed/over boiled? Overproofing is the most likely reason for them flattening after boiling.
Hmmm, it may have been over proofed because it seemed to break apart when forming the bagels. Thanks, I’ll try again and watch more carefully on the proofing.
Hello!
I was wondering if I could sub the olive oil with avocado oil?
I can’t wait to try this recipe!
Yes, absolutely! Enjoy :)
Hi. These taste great but they aren’t the prettiest girls at the party
What can be done to get a taller bagel? Is there a way to get a smoother texture on the outside?
Or are gf bagels kinda flat and nubbly? I’m new to this
Hi DM, they shouldn’t be too flat and nubby! They won’t be as smooth as regular bagels, but it’s really all in the shaping. You’ll need to shape them taller and thicker to get a loftier bagel, and do your best to smooth the dough as you shape to help prevent them from being scraggly. Sometimes it’s easier for people to get a smooth texture to roll into a log and then connect the ends, as opposed to making a round bagel and then poking a hole. Experiment with different ways of shaping to see what works best for you!
Perfect! Thank you
I made these today, the dough was very sticky after mixing. Should I have added more flour?
Hi Peggy, not necessarily – did you let the dough set for a few minutes to let the psyllium absorb? Usually it will get a little stiffer after the liquids have a chance to absorb. Did you change anything about the recipe?
It was still very sticky after the bulk fermentation, so I probably should have added more flour.
Hi Rachel,
I pressed the 3x button and when i was measuring out the ingredients i noticed that some of the ingredients weren’t changing amounts. the ingredients are the maple syrup, tapioca flour, brown rice flour, and sea salt….is that supposed to be that way?
Thanks
Susanna
No they should all be changing, I’ll check on it – thanks for letting me know!
My granddaughter was recently diagnosed as celiac and I’ve jumped into the interesting world of GF baking. As a longtime bread baker it’s been quite a journey! Made this recipe a couple of times and always turn out perfectly. Thanks for this great recipe Rachel and as I now have your book, more fun to come
I’m so glad you’re loving the bagels, so kind of you to make them for your granddaughter! She’s lucky to have you. Thanks so much for the kind feedback.
i made your bread flour and it said i can use it in this recipe but the recipe lists all the flours separately. How much of the flour blend do i use instead?
Hi Onna, the recipe card of the flour blend gives instructions on how to use it. You add up all the starches and flours called for in the recipe you’re using it in, and use that amount of the blend. It’s 480g for this recipe.