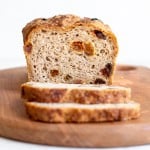
Gluten-Free Cinnamon Raisin Bread
This gluten-free cinnamon raisin bread is soft, fluffy, and fragrant with cinnamon in every single slice. Made with a custom blend of whole-grain gluten-free flours and psyllium husk for a workable, yeast-risen dough, it toasts beautifully and makes the best French toast you've ever had. Vegan and top-8 allergen-friendly.
Servings 16 slices
Calories 127kcal
Ingredients
To activate the yeast
- 7 g (2.5 tsp) active dry yeast
- 100 g warm filtered water
- 40 g maple syrup honey or cane sugar
For the loaf
- 20 g whole psyllium husk
- 355 g filtered water
- 480 g homemade gluten-free bread flour blend or 80g potato starch, 60g tapioca flour or arrowroot flour, 125g sorghum flour, 125g brown rice flour and 90g millet flour
- 12 g sea salt
- 4 g cinnamon
- 55 g raisins soaked in hot water for 10 minutes and then drained
Makes: 8inch round
Instructions
- In a small bowl, combine the yeast with the sweetener of your choice and warm water, between 100-110℉. It should feel warm, but not hot, to the touch. Let it sit to activate for about 10 to 15 minutes. You should notice it start to bubble, and then it will get nice and foamy on top.7 g (2.5 tsp) active dry yeast, 100 g warm filtered water, 40 g maple syrup
- In a bowl or liquid measuring cup, mix together the psyllium husk and water. Whisk together, breaking up the psyllium, and let it set for a few minutes until it’s thickened and gel-like.20 g whole psyllium husk, 355 g filtered water
- In a large mixing bowl or the bowl of your stand mixer, mix together all of your flours, starches, salt, and cinnamon. Whisk to combine.480 g homemade gluten-free bread flour blend or, 12 g sea salt, 4 g cinnamon
- Add the psyllium gel and the activated yeast mixture to your dry ingredients. If using a stand mixer, fit it with the dough hook and let it mix up the dough until combined and smooth, scraping down the sides a few times during the process, and flipping the dough around to make sure it’s fully mixed on the bottom too. You can also do this by hand. If doing it by hand, I like using a dough hook to get it mostly combined. Then, turn it out onto the countertop and use your hands to knead the rest of the flour in. Once it's mostly combined, mix in the raisins.55 g raisins
- Knead and shape it into your desired shape. Then, place it in the banneton (seam side up) - I like a 7" banneton, or a loaf pan (seam side down - mine was 8.5 x 4.5") for the proof.
- Cover with a tea towel and let the loaf rise for one hour in a warm place. It should just about double in size again. Preheat the oven to 425℉ while the Dutch oven rises, if using.
- Once it’s risen, score the bread (carefully flipping it out of the banneton onto parchment or a silicone sling if baking in a Dutch oven). If you’re baking in a loaf pan, you may want to brush the top with oil to get a nice golden crust. You can also sprinkle with cinnamon sugar, if desired. It makes a delicious sugary crust!
- Place into your baking vessel if using a Dutch oven. If using a loaf pan, just place right into the oven. Bake for 1 hour and 15 minutes, removing the lid for the last 15 minutes if baking in a Dutch oven. It should be golden brown and crusty.
- Remove from the baking pan and set on a cooling rack to cool completely. This is definitely the hardest part, but you really need to let the loaf cool completely so the inside can set. I try to let it cool overnight, but you’ll want to let it cool for at least four to five hours. It should be fully cool to the touch before cutting into your loaf.
- Slice and eat. This bread is great raw, toasted, or however else you want to enjoy it!
Notes
Oat flour is also great in this recipe, in place of all or part of the sorghum/brown rice flours. I recommend experimenting with different grain flours to find the combo you like best!
To use instant yeast: Substitute 1:1 by weight. Skip the activation step and add the instant yeast directly to your dry ingredients. Combine the warm water and maple syrup separately and add them in when the recipe calls for the yeast mixture. Check the dough a little earlier during the first rise, as instant yeast works faster than active dry.
Make Ahead & Storage
- Room temperature: Store in an airtight container or bread bag at room temperature for up to two days.
- Refrigerator: Keeps well in the fridge for up to one week. The texture may firm up slightly when cold, but it toasts beautifully straight from the fridge.
- Freezer: This bread freezes exceptionally well for up to three months. Slice the entire loaf before freezing and store slices in a zip-top freezer bag. Toast directly from frozen, no thawing needed.
Nutrition
Serving: 1slice | Calories: 127kcal | Carbohydrates: 30g | Protein: 2g | Fat: 0.3g | Saturated Fat: 0.1g | Polyunsaturated Fat: 0.01g | Monounsaturated Fat: 0.02g | Sodium: 293mg | Potassium: 39mg | Fiber: 2g | Sugar: 2g | Vitamin A: 1IU | Vitamin C: 0.2mg | Calcium: 11mg | Iron: 0.1mg
