Description
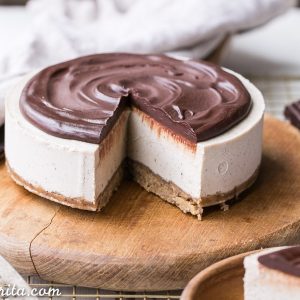
This No-Bake Vanilla Bean Cheesecake is a gluten-free, Paleo, and vegan cheesecake made with a walnut crust, a creamy cashew cheesecake filling, topped with a luscious chocolate ganache. This healthier cheesecake alternative will satisfy your cheesecake cravings!
Ingredients
Scale
For the graham cracker crust
- ½ cup (64g) raw walnuts
- ½ cup (48g) almond flour
- 2 pitted dates
- 2 tablespoons (25g) coconut oil
- 1 teaspoon cinnamon
- ¼ teaspoon kosher salt
For the cheesecake
- 2 cups (240g) raw cashews, soaked in water for at least six hours or preferably overnight, drained and rinsed before using (see Notes)
- ½ cup (120g) canned coconut milk, shaken
- ¼ cup (50g) coconut oil, melted and cooled, use refined coconut oil if you want no coconut flavor
- ⅓ cup (111g) pure maple syrup
- 2 tablespoons fresh lemon juice
- 1 tablespoon vanilla extract or 1 teaspoon vanilla bean powder
For the chocolate ganache
- 3 oz. dark chocolate, I used 72%
- ⅓ cup (80g) canned coconut milk
Instructions
- Grease a 6” springform pan with coconut oil, or line an 6” cake pan with strips of parchment paper for easy removal, and grease well with coconut oil. Set aside.
- Add the walnuts, almond flour, pitted dates, coconut oil, cinnamon and salt to a food processor or high-powered blender and pulverize until it comes together into a sort of sticky dough, with small walnut bits remaining. Don’t over process, or it’ll turn into nut butter! Press the date dough evenly along the bottom of the prepared pan.
- In the same food processor or high-powered blender (no need to wash between – I used my Vitamix, but most powerful blenders should do the job), combine all of the filling ingredients and blend for about 2 minutes, or until the mixture is silky smooth and creamy. Scrape down the sides as necessary. You may need to add a bit more coconut milk or lemon juice to get it to blend smoothly if your blender isn’t super high-powered.
- Once it’s smooth, taste the mixture and adjust the sweetness/tartness levels, if desired.
- Pour the filling into the prepared pan over the crust. Smooth out the top and tap the pan hard against the counter a few times to release any air bubbles. Place in the freezer.
- Place in the freezer to set for at least 3 hours or until completely firm before adding the chocolate ganache.
- To make the ganache, place the chopped chocolate into a bowl. Warm the coconut milk in a saucepan until just simmering, and pour over the chocolate. You can also warm the coconut milk in the microwave for 30 seconds. Make sure the milk is covering all the chocolate and let stand for 2 minutes. Stir until smooth, and then spread over the cheesecake.
- Serve immediately, or place in the refrigerator or freezer until ready to serve.
- If storing in the freezer, let it thaw in the refrigerator for a few hours before serving or let thaw at room temperature for 15 minutes before serving. I recommend running your knife under hot water to warm it up before cutting the cheesecake with the still-hot (dried) knife.
- Store leftovers tightly wrapped in the freezer (3 months) or refrigerator (5 days).
Notes
You can also cover the cashews in very hot/boiling water and let them sit for about an hour if you want to speed up the process – it won’t be quite as creamy, but it will do the trick!