Description
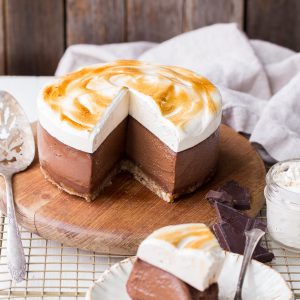
This No Bake S’mores Cheesecake has a graham cracker flavored crust topped with chocolate ganache, rich chocolate “cheesecake” made with soaked cashews, and a layer of homemade toasted marshmallow on top! You’d never guess this decadent dessert is gluten-free, dairy-free, and Paleo.
Ingredients
Scale
For the crust
- ½ cup raw pecans
- ½ cup almond flour
- 2 pitted dates
- 2 tablespoons coconut oil or ghee, ghee gives a nice buttery flavor
- 1 teaspoon cinnamon
- ¼ teaspoon kosher salt
For the cheesecake
- 2 cups raw cashews, soaked in cold water for at least four hours or preferably overnight
- ¾ cup full-fat canned coconut milk
- 2 tablespoons coconut oil, melted and cooled, use refined coconut oil if you want no coconut flavor
- ⅓ cup pure maple syrup
- 6 ounces dark chocolate, divided (I used 72%)
- 2 tablespoons fresh lemon juice
- 1 tablespoon vanilla extract or ½ teaspoon vanilla bean powder
For the marshmallow topping
- ¼ cup water
- 1 tablespoon gelatin, I use Vital Proteins
- ¼ cup water
- 1 cup (11 oz.) pure maple syrup
- pinch sea salt
- 2 teaspoons vanilla extract
Instructions
- Grease a 6” springform pan with coconut oil, or line an 6” cake pan with strips of parchment paper for easy removal, and grease well with coconut oil. Set aside.
- Add the pecans, almond flour, pitted dates, coconut oil, cinnamon and salt to a food processor or high-powered blender and pulverize until it comes together into a sort of sticky dough, with small pecan bits remaining. Don’t over process, or it’ll turn into nut butter! Press the pecan date dough evenly along the bottom of the prepared pan.
- Chopped the dark chocolate very finely. Place in a heatproof bowl; set aside. In a microwavable bowl, heat the coconut milk for 1 minute or until steaming hot. Pour over the chocolate, making sure it’s all covered, and let sit for 2 minutes to let the chocolate melt. Whisk until smooth.
- Measure out 1/3 cup of the melted chocolate and spread it on the crust. Place in the fridge or freezer to harden.
- In the same food processor or high-powered blender used for the crust (no need to wash between – I used my Vitamix, but most powerful blenders should do the job), combine all of the filling ingredients, including the remaining melted chocolate, and blend for about 2 minutes, or until the mixture is silky smooth and creamy. Scrape down the sides as necessary. You may need to add a bit more coconut milk or lemon juice to get it to blend smoothly if your blender isn’t super high-powered.
- Once it’s smooth, taste the mixture and adjust the sweetness/tartness levels, if desired.
- Pour the filling into the prepared pan over the chocolate. Smooth out the top and tap the pan hard against the counter a few times to release any air bubbles.
- Place in the freezer to set for at least 3 hours or until completely firm before topping with the marshmallow fluff.
- For the marshmallows, stir together the gelatin and 1/4 cup water in the bowl of a stand mixer fitted with the whisk attachment, making sure all the gelatin is moistened.
- In a small saucepan, combine the other 1/4 cup water, maple syrup, and salt. Bring to a boil and cook, stirring occasionally, until mixture reaches soft ball stage on a candy thermometer, about 238-240ºF (112-115ºC).
- Turn the stand mixer on low and stream the hot syrup over the gelatin. Once all the syrup has been added, slowly turn the speed up to medium-high and beat until the mixture becomes lukewarm and turns white, fluffy, and stretchy. Add the vanilla extract while it’s beating. This should take about 10 minutes.
- Once it’s ready, pile it on top of the cheesecake (you may not use it all) and toast until brown with a kitchen torch. You can spread any extra marshmallow into a small greased pan or ice cube tray to make some extra marshmallows.
- Slice and serve immediately, or store in the refrigerator. I recommend running your knife under hot water to warm it up before cutting the cheesecake with the still-hot (dried) knife.
- Serve frozen or let them thaw at room temperature for 10-15 minutes before serving. Store in the freezer for up to 2 weeks.
Notes
Prep time does not include chilling of the cheesecake between layers being added.
Because gelatin is used, this recipe is not vegan. Agar agar may be substituted for the gelatin as a vegan alternative, but I haven’t tried it so I can’t make any guarantees.
