Description
*There is a TON more information & FAQs in the blog post above, so check there to see if your questions are answered*
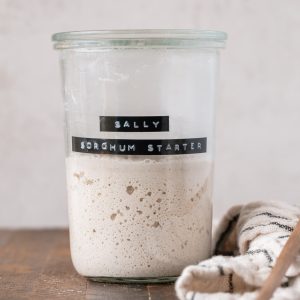
Always wanted to make your own gluten-free sourdough bread? To get started, first you’ll need to learn How to Make a Gluten-Free Sourdough Starter! All it takes is gluten-free flour, water, and time.
This process takes about one to two weeks, twice a day in the beginning, but only takes a few minutes for each feeding.
If you want to see more visuals of the process, I documented the entire process of creating a sourdough starter from scratch on my Instagram story highlights. You can go to my Instagram page and look for “GF Starter” and “Starter 2” to see the process. There is also a Starter Q&A highlight with helpful troubleshooting.
Ingredients
- Gluten-Free Whole Grain Flour, I recommend brown rice flour, sorghum flour, buckwheat flour, or millet flour, or a combination. I’d start with about 3 lbs – you’ll need more for maintenance but this will be a good starting amount!
- Room Temperature Filtered Water
Instructions
How to Prep for Your Starter
- Clean your jar well with soap and hot water. It doesn’t need to be sanitized in a hot water bath like canning, but it needs to be clean to make sure there are no bacteria lurking around that will harm your starter and hinder its growth.
- Weigh your jar on your scale. Using a label or piece of tape, mark your jar with how much it weighs. This will help you to know exactly how much starter you have left in your jar when you’re feeding.
Days One and Two: twice a day feedings
- In the morning, combine 50g flour and 50g room temperature water in your clean jar using a non-reactive spoon, like stainless steel or wood. If you’re using an absorbent type of flour, you may need a little bit more water. You’re looking for a thick paste-like consistency. Scrape down the sides of the jar and close lightly, not fully sealed but covered. You can also cover it with a tea towel and a rubber band to hold it in place.
- Leave in a slightly warm place all day. Repeat at night before you go to bed (about 12 hours later), adding 50g more of each flour and water to the jar. Stir, and scrape down. We’re doing twice a day feedings in the beginning to help strengthen the starter quickly.
- Repeat this process morning and night for two full days, or four total feedings. You should be noticing some bubbles by now, and maybe some odd smells! Persevere through any bad smells, they should go away in a few days.
Days Three through Seven:
- First Discard: If you’re seeing bubbles and have a sour smell, you’re ready to discard. Day three you’ll want to remove half of the starter. Later on in the process, you can keep the starter to use for other recipes. But at this point, you’ve still got bad bacteria in the mix, so I recommend throwing it away or putting it into your compost.
- For the next five days, you’ll want to discard half of the starter every feed. Keep feeding 50g each of flour and water. We’ll up this to 100g for maintenance when we start baking with it, but for now, we don’t want to create any extra waste! You may notice your starter gets less active when you start discarding it. Don’t worry – that’s normal, and your starter is just gaining strength.
- Keep feeding twice a day until you start seeing good bubbles. Once you’re seeing good bubbling and rise, you can switch to once-a-day feeds.
Week 2
- Around this time is when I generally start having a nice bubbly starter with a pleasant, yeasty smell. However, everyone’s conditions are different, so don’t worry if you’re not there yet! Just continue on with feedings. If your starter is smelling good at this point with good bubbles, you can start using the discard for sourdough discard recipes.
- Once you start seeing good bubbles and have a pleasant smell, this is usually sometime during the second week, increase your feedings to 100% hydration, with 100g of flour.
- 100% hydration feeding means a 1:1:1 ratio of starter:flour:water. This can vary slightly based on the absorbency of your flour, but it will be about equal. For my brown rice flour starter, it ends up being pretty even, but with my sorghum starter, I find I only need about 80g of sorghum flour to 100g each of starter and water. We’re looking for a thick, pasty consistency, so add a little extra water if your starter gets too thick.
- Once you switch to the 100% hydration feeding, you will start seeing good growth and should notice that your starter will double (or come close) sometime between three to five hours after feeding. When it’s at its highest, that’s what we call peak activity. Peak activity is when you’ll want to mix up your preferment for your sourdough bread.
Starter Maintenance
Where to store your starter: I store mine on the counter and it does well. In cooler climates, some people prefer to keep it in a warm area, such as on a fireplace mantle, the microwave, or in an oven with the oven light on. If you choose to risk it with the oven, I recommend place a post-it note over the “on” button so you don’t preheat your oven with the starter in it! Once established, you can store your starter in the refrigerator.
Regular Feeding Instructions: if your starter is at room temperature, you will want to feed it every day so it doesn’t get too “hungry” and create a lot of “hooch”, the alcoholic liquid that can form on top of a hungry starter. You will continue with the 100% hydration feedings, meaning you will discard down to 100g of starter every day, and feed it with 100g room temperature filtered water and 80-100g gluten-free whole grain flour. Mix well and cover lightly.
If you are storing your starter in the refrigerator: you will only need to feed once a week, following the same instructions as above.
- If you are feeding for maintenance: you can feed and return straight to the refrigerator.
- If you are feeding to prepare for a bake: remove from the refrigerator, feed as normal, and make your preferment when the starter is at peak rise. Sometimes, two feedings are needed to help the starter come back from its dormancy in the fridge and get to a good, bubbly rise.
Notes
If you want to see more visuals of the process, I documented the entire process of creating a sourdough starter from scratch on my Instagram story highlights. You can go to my Instagram page and look for “GF Starter” and “Starter 2” to see the process. There is also a Starter Q&A highlight with helpful troubleshooting.
Keywords: gluten-free sourdough, sourdough starter, gluten-free sourdough starter