Rainbow Cake
A six-layer Rainbow Cake that is absolutely perfect for any occasion! This makes any birthday celebration so much more fun, and it’s easier than it looks.

I love Thanksgiving. It’s such a happy holiday.
I’ve never understood how some people don’t like it. I guess it’s because some people don’t get along with their families, but if you’ve been reading for a while, you know that my family and I are tiiight like spandex.
Awkward analogy, but hey, you know me.

My family is just crazy, both sides. However, this Thanksgiving my sister and I spent with my dad’s side of the family. We should have a reality T.V. show. The founders of this amazing family are my grandparents, Grammy and Pop Pop, who are the total stereotypical grandparents except way better. Grammy is the most incredible cook (but she hates to bake, which is where I come in), and my grandpa is the cutest man. I love them to death. Then we have their kids. 2 boys, 2 girls. My dad, Danny, is the oldest. He’s crazy, funny, determined, brilliant, and loving all at the same time. Then we have Steven…we don’t see him much cause he moved to Arizona, but he was here this Thanksgiving with his sons. I’m so glad they came because I missed those boys a ton. Matt is 14 and Spencer is 12; they are the sweetest boys. I’m so glad I got to see them! Lori’s next. We’ve talked about her quite a bit, mostly cause I’m with them all. the. time. I love hanging out with the Elfuses. Her husband Brian is one crabby man, but I love him all the same. :) Usually when I’m not at home, at school, or running errands, you can find me with Lori, Brian and Sami. Last but most certainly not least is Tara. Her and her husband, Nir, are the cutest couple and have the most adorable family of kids EVER. They have four: Eliana, a gorgeous 3-week old girl, Max and Jordan, 2 year old twins, and Zachary, the most adorable 3 year old ever. This weekend we nicknamed them the Forceful Four. You should have seen the restaurant we went to yesterday after they were done eating. I feel bad for whoever had to clean up that table.
As you can see, my family is insane. But in a good way…usually.
So, holidays like Thanksgiving are fun, crazy, stressful, amazing, loud, and oh so entertaining with my family. If you don’t like your family, feel free to join mine. We’re a very welcoming bunch!
Food time. Everyone knows the most important part of Thanksgiving is food, but something you usually don’t have on the Thanksgiving menu is a birthday cake. But we did! Lori’s birthday just happened to fall on Thanksgiving Day this year, so naturally I was left with the task of creating a “Rachel creation” birthday cake for her.
She isn’t the biggest fan of chocolate, so when anything chocolately was out of the picture, I immediately flashed back to a cake my friend Isabelle had sent me a picture of. It was a rainbow. It was beautiful. I was in love. I was so making it.

I thought it would be really hard, but it turned out to be pretty simple. The most annoying part was making sure that each layer had an equal amount of batter so that no layer was thicker than other. I weighed it out…anal much? I also took the opportunity to try out a frosting I’ve been hearing about lately: the notoriously-difficult French Buttercream. Surprisingly, it gave me no issues at all. Except for the issue that I wanted to eat it out of the bowl with a spoon…let’s not talk about that.
It was perfectly smooth and creamy, not too sweet which is usually my issue with frosting, and tastes like heaven. Lori however, is a frosting hog. She loves her frosting, and she likes it cloyingly sweet and mounded on the cake. I was worried she wouldn’t like it because of it’s lack of sweetness so when she came over the day before, I made her try it so I knew I had her approval. To my surprise, she loved it.
Thank goodness.
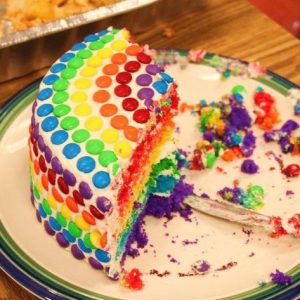
 (This one I made in June 2011 for my English class, the outside is covered in rainbow covered M&M’s, definitely an easy but wow-factor way to decorate this cake!)
Overall, this cake was a bit labor intensive but so worth it for the oohs and aahs you’ll get when you cut this beauty open. You can use traditional rainbow colors or use whatever other colors you like. I used colors I thought were purrtyyy! :)
So…whether your coming out to your parents, it’s your aunts birthday, you want a piece of pretty cake, or your best friend demands you make it for her cause it looks so freaking cool, you need to make this cake.
Get into your kitchen and get baking. It’s so worth it.
Rainbow Cake
- Prep Time: 15
- Cook Time: 25
- Total Time: 40 minutes
Ingredients
For the cake
- Vegetable shortening
- 3 cups all-purpose flour
- 4 teaspoons baking powder
- 1/2 teaspoon salt
- 2 sticks (1 cup) unsalted butter, room temperature
- 2 1/3 cups sugar
- 5 large egg whites, room temperature
- 2 teaspoons pure vanilla extract
- 1 1/2 cups milk, room temperature
- Six different colors of gel food coloring
For the frosting
- 6 oz egg yolk
- 1 pound sugar
- 4 oz water
- 1 1/4 pound butter (5 sticks)
- 1 tsp vanilla extract
Instructions
For the cake
- Preheat oven to 350 degrees. Brush six 9-inch-round cake pans (or as many 9-inch cake pans as you have, reusing them as necessary) with shortening. Line bottom of each cake pan with parchment paper; brush again and set aside.
- In a large bowl, whisk together flour, baking powder and salt; set aside. In the bowl of an electric mixer fitted with the paddle attachment, cream together butter and sugar. Slowly add egg whites and mix until well combined. Add vanilla and mix until fully incorporated. Add flour mixture and milk in two alternating additions, beginning with the flour and ending with the milk. Mix until well combined.
- Divide batter evenly between six medium bowls. Add enough of each color of food coloring to each bowl, whisking, until desired shade is reached. Transfer each color to an individual cake pan. Transfer to oven and bake until a cake tester inserted into the center of each cake comes out clean, about 15 minutes (work in batches if necessary).
- Remove cakes from oven and transfer to a wire rack; let cool for 10 minutes. Invert cakes onto a wire rack; re-invert and let cool completely.
For the frosting
- Add water and sugar to a small sauce pan, place on med-high heat until 115 degrees Celsius. Do not stir once it begins to boil. While the sugar syrup is boiling, begin to whip the eggs yolks on med speed until they are light and fluffy. Very CAREFULLY and SLOWLY pour the sugar syrup into the egg yolks while the mixer is still going (have a friend do it, if you’re using hand mixer). You don’t want to scramble the eggs or crystallize the sugar. Continue on medium-low speed until no longer hot (feel side of the bowl, it should be about body temperature). Slowly add the butter in chunks, allowing it the be incorporated fully before adding more. Once all the butter has been added, add the vanilla. It will be very runny, but will thicken once refrigerated.
How to Assemble the Cake
- Using a serrated knife or cake leveler, trim tops of cakes to make level. Place four strips of parchment paper around perimeter of a serving plate or lazy Susan. Place the bottom layer on the cake plate. Spread a scant 1 cup buttercream filling over the first layer with a small offset spatula so it extends just beyond edges. Repeat process with the rest of your layers.
- Place the remaining red layer on top, bottom-side up. Gently sweep away any loose crumbs with a pastry brush. Using an offset spatula, cover the top and sides with a thin layer of frosting (also use any of the excess frosting visible between the layers). Refrigerate until set, about 30 minutes.
- Using an offset spatula, cover cake again with remaining frosting. I sprinkled mine with some sprinkles and let the inside speak for itself, but feel free to decorate however you please!
Keywords: cake, buttercream, rainbow, sprinkles, vanilla, frosting, dessert

What a beautiful cake! I’ve been wanting to make one like it for a long time. It sounds like you had a great Thanksgiving!
Looks so colorful and beautiful! love it :) Glad you had an awesome thanksgiving!
I love the colours! It’s so bright and happy, sounds like you had a beautiful thanksgiving
I’m still looking for my pear-man to be up here ;)
“Was that a good one!?” so stupid… but kinda funny :)